注,此指南可搭配 bilibili 尚硅谷的react教程食用~
视频传送门
第一章:React入门
介绍:
react是一个用于构建用户界面的JavaScript库,由FaceBook开源供全球开发者使用
React特点:
- 声明式编码
- 组件化编码
- 移动端通过ReactNative编写原生应用
- 高效(Diff算法+虚拟DOM,最小化页面重绘时间)
- etc.
下面是一个最基本的React页面:
<!DOCTYPE html>
<html lang="en">
  <head>
    <meta charset="UTF-8" />
    <meta http-equiv="X-UA-Compatible" content="IE=edge" />
    <meta name="viewport" content="width=device-width, initial-scale=1.0" />
    <title>Document</title>
  </head>
  <body>
    <!-- 准备好一个容器 -->
    <div id="app"></div>
    <!-- 核心库 -->
    <script src="../react/react.development.js"></script>
    <!-- dom库 -->
    <script src="../react/react-dom.development.js"></script>
    <!-- babel -->
    <script src="../react/babel.min.js"></script>

    <!-- code here -->
    <!-- babel -->
    <script type="text/babel">
      // jsx代码
      //创建虚拟DOM
      const VDOM = (
        <h1>
          <span>hello,React</span>
        </h1>
      ); /*此处不用加引号 jsx特有语法*/
      //渲染虚拟DOM到页面(已过时)
      ReactDOM.render(VDOM, app);
    </script>
  </body>
</html>
虚拟DOM和真实DOM
- 关于虚拟DOM
- 1.本质是Object类型的对象
- 2.虚拟DOM比较轻量化
JSX语法规则
在jsx文件中编写html元素时候,需要遵循以下几点:
- 定义虚拟DOM的时候,无需添加引号。
- 标签中混入JS表达式时需要使用{ }
- 在jsx中DOM的class属性需要使用className替代。
- 内联样式,要用style-{{key:value}}的形式去写。
- 一个虚拟DOM只有一个根标签
- 标签必须闭合
- 若小写字母开头,则将该标签转为html中同名元素,如html中无该标签对应的元素,则报错
- 若大写字母开头,则被视为一个React Component,如找不到则报错
const myId = "kanoKano";
const myData = "AbCd";

//1.创建虚拟DOM
const VDOM = (
    <div>
        <h2 className="yellow" id={myId.toLowerCase()}>
            <span style={{ color: "red", fontSize: "30px" }}>
                {myData.toLowerCase()}
            </span>
        </h2>
        <h2 className="yellow" id={myId.toLowerCase()}>
            <span style={{ color: "red", fontSize: "30px" }}>
                {myData.toLowerCase()}
            </span>
        </h2>
        <Hello></Hello>
    </div>
);

//2.渲染DOM
ReactDOM.render(VDOM, document.querySelector("#app"));
遍历数据
在React中,如需渲染的数据是一个数组,这时候就可以使用自动遍历:
注意:自动遍历需要一个key作为唯一值
const data = [{ name: "Angular" }, { name: "React" }, { name: "Vue" }];
//for
// 自动遍历需要一个key作为唯一值
const VDOM = (
    <div>
        <h1>前端js框架列表</h1>
        <ul>
            {data.map((item, index) => (
                <li key={index}>{item.name}</li>
            ))}
        </ul>
    </div>
);

//渲染
ReactDOM.render(VDOM, document.querySelector("#app"));
组件与模块
和vue类似,React也可以实现组件化编程和模块提取
函数式组件
函数式组件适用于简单组件的定义
// 1.创建函数式组件(函数首字母需要大写)
function Demo() {
    return <h2>我是用函数定义的组件(适用于简单组件的定义)</h2>;
}
//渲染组件到页面
ReactDOM.render(<Demo />, document.querySelector("#app"));这里需要注意的是,渲染组件的时候,不能直接写函数名,需要以组件标签的形式<Demo /> 填写
以上代码经过babel编译后,Demo下的this指向的就是undefined了,因为babel自动开启了严格模式
执行了ReactDOM.render之后,发生了以下事情:
- React解析组件标签,找到了对应的组件
- 发现组件是使用函数定义的,随后调用该函数,将返回的虚拟DOM转为真实DOM,随后呈现在页面中
类式组件
创建一个类式组件:
//创建类式组件
class MyComponent extends React.Component {
    render() {
        console.log("render中的this", this);
        return <h2>我是用类定义的组件【适用于复杂组件的定义】</h2>;
    }
}
//2.渲染组件到页面
ReactDOM.render(<MyComponent />, document.getElementById("app"));
执行了ReactDOM.render(
- react解析组件标签,找到了MyComponent组件
- 发现组件是使用类定义的,随后new出来该类的实例,并通过该实例调用到原型上的方法
- 讲render返回的虚拟DOM转换为真实DOM,随后呈现在页面中。
关于render中的this:
- render是放在MyComponent的原型对象上供实例使用
- render中的this是谁?是:MyComponent组件的实例对象
组件实例对象里面有三个比较常用的属性:
context
props
refs
state
下面会一一介绍以上属性
组件实例的三大核心属性
state
state是组件对象最终要的属性,值是对象(可以包含多个 key-value 的组合)
组件被称为"状态机",通过更新组件的state来更新对应的页面显示(重新渲染组件)
不过需要注意:
- 组件中render方法中的this为组件实例对象
- 组件自定义方法中this为undefined的解决方法:
- 通过函数对象的bind()来指定this的指向
- 使用箭头函数忽略当前层次的this
- 状态数据不能直接修改或更新
下面展示了一个简单的state用法的例子:
// jsx代码
class Weather extends React.Component {
    //传递props
    constructor(props) {
        super(props);
        //初始化状态
        this.state = {
            isHot: false,
            wind: "大风",
        };
        //使用bind也可以更改this指向,直接挂载函数到实例上,但是这样有点费内存(大量new对象的情况下)
        this.demo = this.demo.bind(this);
    }

    render() {
        return (
            <h1 onClick={this.demo}>
                今天天气{this.state.isHot ? "很炎热" : "不炎热"}
            </h1>
        );
    }

    //使用箭头函数,这样this指向才正常,因为作为onclick的回调,加上严格模式,所以才会丢失this
    // demo = () => {
    //   console.log(this);
    //   // 这么改没有用
    //   this.state.isHot = true;
    //   console.log("我被点击了");
    // };

    demo(){
        console.log(this);
        // 直接赋值是无效的,需要使用setState方法(和Flutter类似,setState挂载在React.Componentd的原型对象上
        // this.state.isHot = true;
        //使用setState更新DOM(对象作为参数,参数会合并到实例上的state上)
        this.setState({
            isHot:!this.state.isHot
        })
        console.log("我被点击了");
    };
}

ReactDOM.render(<Weather />, document.querySelector("#app"));
以上简单的实现了一个状态切换的demo,我们遇到了this指向的问题,this指向可以使用bind方法更换指向,并在实例上挂载上修复过后的方法,但是这样做的话会有一点问题:
- 每次添加新方法的时候都需要在构造函数中bind一次,非常不方便
- 使用bind也可以更改this指向,直接挂载函数到实例上,很消耗内存
所以我们综合一下上面的错误,就有了state的标准写法:
class Weather extends React.Component {
    constructor(props) {
        super(props);
    }

    state = {
        isHot: false,
        wind: "大风",
    };

    demo = () => {
        /*
        this.setState({
            isHot: !this.state.isHot,
        });
        */
        //箭头函数写法
        this.setState((oldState) => {
            return {
                isHot: !oldState.isHot,
            };
        });
    };

    render() {
        return (
            <h1 onClick={this.demo}>
                今天天气{this.state.isHot ? "很炎热" : "不炎热"}
            </h1>
        );
    }
}

ReactDOM.render(<Weather />, document.querySelector("#app"));
props
在Vue中,props是定义在组件上的类似参数,用来传值/父子组件通信的一系列属性,在react中也是一样的,不过稍有区别
props是每个组件对象都会有的属性,组件标签的所有属性都保存在props中
以下是props传值的例子:
class Person extends React.Component {
    render() {
        return (
            <ul>
                <li>姓名:{this.props.name}</li>
                <li>性别:女</li>
                <li>年龄:{this.props.age}</li>
            </ul>
        );
    }
}
//渲染
ReactDOM.render(
    <Person name="kano" age="20" />,
    document.getElementById("app")
);
注意,在react中props是只读的,这一点和vue是一样的
此外,props传值的方式有很多种,你可以使用{value}的显示作为props参数,也可以直接使用babel+jsx支持的对象扩展运算符拆开对象(浅拷贝)作为传入的props:
let kano = {
    name: "kanokano",
    age: 18,
};
//注意,这不是解构,也不是展开,这是对象扩展运算,只能在component标签中使用
ReactDOM.render(<Person {...kano} />, document.getElementById("app"));
对props进行限制
有时候我们需要限制props的传入类型,以保证传入的结果的类型正确
此时我们可以使用prop-types包:
npm i prop-types --save使用方法
class Person extends React.Component {
    render() {
        return (
            <ul>
                <li>姓名:{this.props.name}</li>
                <li>性别:{this.props.sex}</li>
                <li>年龄:{this.props.age}</li>
            </ul>
        );
    }
    //必须是静态属性
    static propTypes = {
        // 使用前记得导包
        name: PropTypes.string.isRequired,
        age: PropTypes.number.isRequired,
        speak: PropTypes.func, //函数类型的写法
    };
    static defaultProps = {
        sex: "男",
    };
}
let kano = {
    name: "kanokano",
    age: 18,
    // sex: "女",
};
ReactDOM.render(<Person {...kano} />, document.getElementById("app"));
在函数式组件中使用props
React中的函数式组件其实有一个默认的参数props,我们可以直接使用
//创建组件
function Person(props) {
    console.log(props);
    return (
        <ul>
            <li>姓名:{props.name}</li>
            <li>性别:{props.sex}</li>
            <li>年龄:{props.age}</li>
        </ul>
    );
}
//给属性加上限制
Person.propTypes = {
    // 使用前记得导包
    name: PropTypes.string.isRequired,
    age: PropTypes.number.isRequired,
    speak: PropTypes.func, //函数类型的写法
};
//不传入参数的默认值
Person.defaultProps = {
    sex: "男",
};

let kano = {
    name: "kanokano",
    age: 18,
    // sex: "女",
};
ReactDOM.render(<Person {...kano} />, document.getElementById("app"));
refs
React的refs其实和Vue的$refs是一样的,不过高版本的React好像优化了refs这一特性,转换为和vue3差不多的ref写法使用 ref 操作 DOM – React
让我们一起来看看常见的ref和refs的使用方式:
字符串形式的ref(已弃用)
class Demo extends React.Component {
    //展示左侧输入框的数据
    showData = () => {
        console.log(this.refs["input1"]);
        alert(this.refs["input1"].value);
    };
    //展示右侧输入框的数据
    showData1 = () => {
        alert(this.refs["input2"].value);
    };
    render() {
        // ref(之后的版本已经弃用)
        return (
            <div>
                <input ref="input1" type="text" placeholder="点击按钮提示数据" />
                <button onClick={this.showData}>点我提示左侧的数据</button>
                <p>
                    <input
                        ref="input2"
                        onBlur={this.showData1}
                        type="text"
                        placeholder="失去焦点提示数据"
                        />
                </p>
            </div>
        );
    }
}
ReactDOM.render(<Demo />, document.querySelector("#app"));
内联函数形式的ref
class Demo extends React.Component {
    //展示左侧输入框的数据(ref回调已经将节点挂载在实例上了,无需refs)
    showData = () => {
        console.log(this["input1"]);
        alert(this["input1"].value);
    };
    render() {
        return (
            <div>
                <input
                    ref={ el => this.input1 = el }
                    type="text"
                    placeholder="点击按钮提示数据"
                    />
            </div>
        );
    }
}
注意,ref回调是以内联函数的方式定义的话,在更新过程中这个函数会被执行两次,第一次传入的参数是null,第二次才会传入参数DOM元素,因为每次渲染的时候都会创建一个新的函数实例(毕竟是匿名函数),React会清空旧的ref设置新的ref
可以通过把回调放在class里面就可以解决两次触发回调的问题
不过这个问题是无关紧要的,强迫症可以试试下面的方法
class Demo extends React.Component {
state = { isHot: true };
show = () => {
const { input1 } = this;
alert(input1.value);
};
changeWeather = () => {
//更新的时候会触发两次ref回调
// @ null
// @ <input type="text" placeholder="输入数据">
const { isHot } = this.state;
this.setState({ isHot: !isHot });
};
saveDOM = (el) => {
this.input1 = el;
console.log("@", el);
};
render() {
return (
<div>
<p>今天天气很{this.state.isHot ? "炎热" : "凉爽"}</p>
{/*把回调放在class里面就可以解决两次触发回调的问题*/}
<input ref={this.saveDOM} type="text" placeholder="输入数据" />
<button onClick={this.show}>点我提示数据</button>
<button onClick={this.changeWeather}>点我切换天气</button>
</div>
);
}
}使用createRef(推荐)
除了前面的方法以外,我们还可以使用createRef来绑定和操作DOM
调用createRef后可以返回一个容器,可以存储被ref所标识的节点(一个属性只能绑定一个节点)
class Demo extends React.Component {
    // 调用createRef后可以返回一个容器,可以存储被ref所标识的节点(一个属性只能存一个节点)
    myRef = React.createRef();
    myRef1 = React.createRef();
    show = () => {
        const { myRef } = this;
        console.log(myRef.current);
        alert(myRef.current.value);
    };
    show1 = () => {
        const { myRef1 } = this;
        console.log(myRef1.current);
        alert(myRef.current.value);
    };
    render() {
        return (
            <div>
                <input ref={this.myRef} type="text" />
                <input ref={this.myRef1} onBlur=(this.show1) type="text" />
                <button onClick={this.show}>点我提示数据</button>
            </div>
        );
    }
}
事件处理
前面我们已经知道可以通过onXxx属性指定事件处理函数(注意命名规则)
(React使用的是自定义(合成)事件,而不是使用的原生DOM事件(为了更好的兼容性))
React中的事件绑定和Vue一样,也会自动给事件处理函数传入一个event参数
注意: React中的事件是通过事件委托的方式处理的(委托给组件最外层的元素
class Demo extends React.Component {
    //自动传入事件e
    show2 = (e) => {
        e.target.value = "blur了哦"
        console.log(e.target);
    };
    render() {
        return (
            <div>
                <input onBlur={this.show2} type="text" />
            </div>
        );
    }
}
受控组件与非受控组件
受控组件与非受控组件的区别:
- 受控组件会维护state用于保存dom的状态和数据,使用的时候直接从state内取即可,非受控组件则无state保存状态
- 受控组件可以轻松实现类似Vue的双向数据绑定,非受控组件则难以实现
非受控组件:
class Login extends React.Component {
    handleSubmit = (e) => {
        //这里的e是React重写的表单事件提交对象
        e.preventDefault()
        console.log(e.currentTarget);
        alert(`用户名:${this.username.value}密码:${this.password.value}`);
    };
    render() {
        return (
            <form action="https://kanokano.cn" onSubmit={this.handleSubmit}>
                用户名:
                <input ref={(e) => (this.username = e)} type="text" />
                密码:
                <input ref={(e) => (this.password = e)} type="password" />
                <input type="submit" value="提交" />
            </form>
        );
    }
}
受控组件:
class Login extends React.Component {
    state = {
        username: "",
        password: "",
    };
    saveUsername = (e) => {
        this.setState({
            username: e.target.value,
        });
    };
    savePassword = (e) => {
        this.setState({
            password: e.target.value,
        });
    };
    handleSubmit = (e) => {
        //这里的e是React重写的表单事件提交对象
        e.preventDefault();
        console.log(e.currentTarget);
        alert(`用户名:${this.state.username}密码:${this.state.password}`);
    };
    render() {
        return (
            <form onSubmit={this.handleSubmit}>
                用户名:
                <input type="text" onChange={this.saveUsername} />
                密码:
                <input type="password" onChange={this.savePassword} />
                <input type="submit" value="提交" />
            </form>
        );
    }
}
当然,上面的受控组件的例子还可以进一步优化(函数柯里化),以应对需要绑定大量节点的情况
...
//保存表单数据到状态中
saveFromData = (prop) => {
    //函数柯里化
    return (e) => {
        console.log(e.target.value);
        this.setState({
            // 用中括号表示字符串属性名
            [prop]: e.target.value,
        });
    };
};
render() {
    return (
        <form onSubmit={this.handleSubmit}>
            用户名:
            <input type="text" onChange={this.saveFromData("username")} />
            密码:
            <input type="password" onChange={this.saveFromData("password")} />
            <input type="submit" value="提交" />
        </form>
    );
}
...
组件的生命周期(旧)
和vue一样,React中组件也有生命周期的概念,其生命周期大概分下面三个阶段
-
初始化阶段:由
ReactDOM.render()触发--初次渲染constructor()componentWillMount()render()componentDidMount()
-
更新阶段:由组件内部
this.setState()或父组件render触发shouldComponentUpdate()componentWillUpdate()render()componentDidUpdate()
-
卸载组件:由
ReactDOM.unmountComponentAtNode()触发componentWillUnmount()
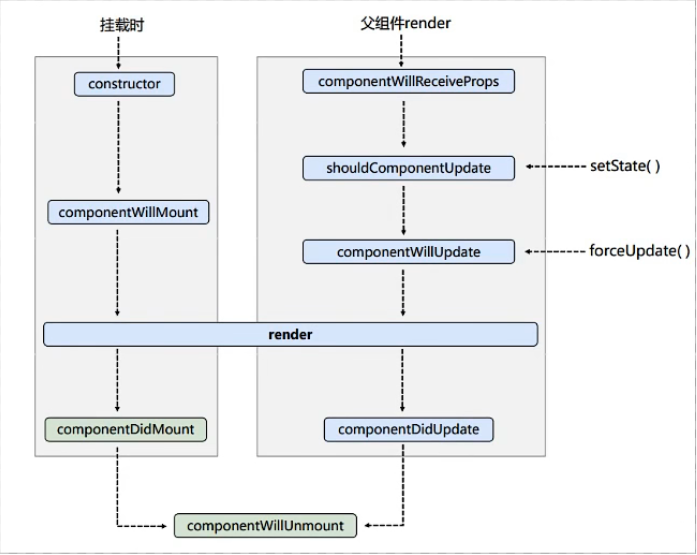
代码演示:
下面的
componentWillReceiveProps需要特别注意:页面打开时组件第一次接收到的props不会触发此钩子
//父组件
class B extends React.Component {
state = { name: "kano" };
change = () => {
this.setState({
name: "kanokano",
});
};
render() {
return (
<div>
<div>B</div>
<button onClick={this.change}>换车</button>
<Count Bname={this.state.name} />
</div>
);
}
}
//创建组件(子组件
class Count extends React.Component {
constructor(props) {
console.log("Count-constructor");
super(props);
// 初始化状态
this.state = { count: 0 };
}
//按钮回调
add = () => {
const { count } = this.state;
this.setState({ count: count + 1 });
};
//卸载按钮的回调
unmount = () => {
ReactDOM.unmountComponentAtNode(document.getElementById("app"));
};
//B将要接收到props(第一次接收到的props不会调用此钩子)
componentWillReceiveProps() {
console.log("B--componentWillReceiveProps");
}
//强制更新按钮的回调(不更改状态也能更新组件)
force = () => {
//强制更新不管shouldComponentUpdate的返回值,都可以重新强制更新
this.forceUpdate();
};
//组件将要挂载的钩子
componentWillMount() {
console.log("Count-componentWillMount");
}
//挂载完毕
componentDidMount() {
console.log("Count-componentDidMount");
}
//组件将要卸载的钩子
componentWillUnmount() {
console.log("Count-componentWillUnmount");
}
//组件是否需要更新,会返回true(执行更新)或者false(不执行更新)
shouldComponentUpdate() {
console.log("Count-shouldComponentUpdate");
return true;
}
//组件将要更新的钩子
componentWillUpdate() {
console.log("Count-componentWillUpdate");
}
//组件更新完毕的钩子,接受两个参数,一个是更新之前的props,一个是更新之前的state
componentDidUpdate(prevProps, prevState) {
console.log(prevProps, prevState);
}
render() {
console.log("Count-render");
const { count } = this.state;
return (
<div>
<h2>当前求和为{count}</h2>
<h2>父组件的值:{this.props.Bname}</h2>
<button onClick={this.unmount}>BOOM</button>
<button onClick={this.force}>
强制更新,不更改状态中的任何数据
</button>
<button onClick={this.add}>点我+1S</button>
</div>
);
}
}
//渲染组件
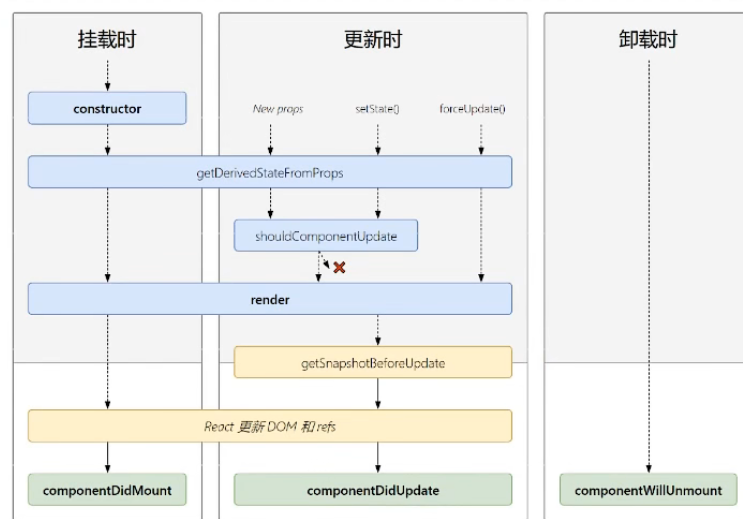
ReactDOM.render(<B />, document.getElementById("app"));组件的生命周期(新)
- 初始化阶段:由
ReactDOM.render()触发--初次渲染constructor()getDerivedStateFromProps()render()componentDidMount()
- 更新阶段:由组件内部
this.setState()或父组件render触发getDerivedStateFromProps()shouldComponentUpdate()render()getSnapshotBeforeUpdate()componentDidUpdate()
- 卸载组件:由
ReactDOM.unmountComponentAtNode()触发componentWillUnmount()
新版本的React组件中增加了
getDerivedStateFromProps和getSnapshotBeforeUpdate两个新钩子,
边缘化了componentWillReceiveProps、componentWillMount和componentWillUpdate三个钩子,原因是这三个钩子意义不大,但却经常被开发人员滥用,所以React开发团队准备边缘化并在未来弃用这三个钩子。
如果实在是想再新版本使用这三个钩子的话,请在前面加上UNSAFE_前缀。
getDerivedStateFromProps
这是新版本React增加的一个预处理钩子,可以将组件传入的props进行返回,用作为state属性
这个钩子还有一个state参数,表示当前实例组件中现有的state
getDerivedStateFromProps 可以返回null或者一个对象
- 当返回值为null的时候代表钩子什么也不做,继续执行生命周期
- 当返回值为一个对象的时候,返回的对象将作为之后的生命周期中的state属性使用
下面的代码可以将组件传入的props用作为state
表示state的值在任何时候都取决于props(可以使用,但没有必要,因为这个操作在构造器里就可以实现)
static getDerivedStateFromProps(props) {
    return props;
}
...
ReactDOM.render(<B />, document.getElementById("app"));
下面的代码可以控制count的值在0-5以内
static getDerivedStateFromProps(props, state) {
    console.log("getDerivedStateFromProps");
    if (state.count > 5 && state.count < 0) {
        return { count: 0 };
    }
    return null;
}
getSnapshotBeforeUpdate
这个钩子在组件更新(render)之前执行,通常我们可以在里面做一些操作,比如获取更新之前的元素的滚动位置等,且这个钩子必须返回一个值(只要不是undefined)
//在更新之前获取之前的快照(需配合componentDidUpdate一起使用)
getSnapshotBeforeUpdate() {
    console.log("getSnapshotBeforeUpdate");
    return "snapshotkanokano";
}

//组件更新完毕的钩子,接受两个参数,一个是更新之前的props,一个是更新之前的state
//还有一个是snapshot的值
componentDidUpdate(prevProps, prevState,snapshotValue) {
    console.log(prevProps, prevState,snapshotValue);
}
下面的例子模拟了一个新闻列表,并且在列表的最上层不断地更新元素
实现的功能:更新列表的同时不影响用户的滚动和预览体验。
原理:滚动的高度随着项目的个数增加而变大
公式:滚动的位置=现在的list高度减去之前的高度
class NewList extends React.Component {
    state = { newsArr: [] };

    componentDidMount() {
        setInterval(() => {
            //获取原状态
            const { newsArr } = this.state;
            //模拟一条news
            const news = "新闻" + (newsArr.length + 1);
            //update
            this.setState({ newsArr: [news, ...newsArr] });
        }, 500);
    }

    getSnapshotBeforeUpdate() {
        //拿一下内容区的高度
        return this.refs.list.scrollHeight;
    }

    componentDidUpdate(prevProps, prevState, snapshot) {
        //滚动的高度随着项目的个数增加而变高,这样就可以让滚动页面“固定”起来了
        //滚动的位置=现在的list高度减去之前的高度
        this.refs.list.scrollTop += this.refs.list.scrollHeight - snapshot;
        console.log(snapshot);
    }

    render() {
        return (
            <div className="list" ref="list">
                {this.state.newsArr.map((item, index) => (
                    <div className="news" key={index}>
                        {item}
                    </div>
                ))}
            </div>
        );
    }
}
效果:

第二章 React工程化开发
React脚手架
脚手架顾名思义,就是用来帮助程序员快速创建一个基于xx库的模板项目的工具
一个脚手架包含了:
- 所有需要的配置(语法检查、jsx编译、devServer等)
- 所需的依赖
- 一个示例DEMO
React和Vue一样,也有相关的脚手架工具,叫做 create-react-app
安装方法:
npm i create-react-app -g && create-react-app myapp以上的安装方法不太推荐,这里推荐使用npx快速创建react实例的方法:
npx create-react-app myapp启动项目:
npm start初始化后的目录树如下:
│  .gitignore   -- git的忽略文件
│  package-lock.json -- 固定版本号后的npm包描述文件
│  package.json -- npm包描述文件
│  README.md
│
├─public --存放静态资源的目录
│      favicon.ico --站点图标
│      index.html --主页
│      logo192.png
│      logo512.png
│      manifest.json --app的配置文件(通过浏览器添加到桌面上的图标的信息 https://developers.google.com/web/fundamentals/web-app-manifest/)
│      robots.txt --控制搜索引擎爬虫规则
│
└─src
        App.css --App组件样式
        App.js  --App组件的js文件
        App.test.js --单元测试用
        index.css --全局样式
        index.js --入口文件
        logo.svg
        reportWebVitals.js --页面性能测试用
        setupTests.js --应用整体测试用
以上是React默认生成的Demo,但在初期学习中,为了简化,我们使用的目录结构通常是下面这样的:
│  .gitignore
│  package-lock.json
│  package.json
│  README.md
│
├─public --存放静态资源的目录
│      favicon.ico --站点图标
│      index.html --主页
│
└─src
    │  App.jsx
    │  index.js
    │
    └─components
        └─Hello
                index.jsx
                index.module.css
在React里,组件通常是用jsx为扩展名命名,位于
components/组件名/index.jsx中
样式文件和组件文件放在同一个目录,但是以module.css为扩展名,这样可以在import的时候模块化css(less),就可以变量名.css属性的形式来使用css(less)类
下面展示了一个Hello组件的写法:
import React, { Component } from "react";
//把css文件改成module.css文件就可以避免样式冲突的问题
import hello from "./index.module.css";
export class Hello extends Component {
  render() {
    return (
      <div>
        <h4 className={hello.title}>Hello React</h4>
      </div>
    );
  }
}
App组件的写法
import { Hello } from "./components/Hello";
//App组件一般用函数式就可以了
function App() {
  return (
    <div>
      <p>我是App组件</p>
      <Hello />
    </div>
  );
}
export default App;
入口文件(index.js)的写法
import React from "react";
import ReactDOM from "react-dom/client";
import App from "./App";

const root = ReactDOM.createRoot(document.getElementById("root"));
root.render(<App />);
index.html的写法
<!DOCTYPE html>
<html lang="en">
  <head>
    <meta charset="utf-8" />
    <link rel="icon" href="%PUBLIC_URL%/favicon.ico" />
    <meta name="viewport" content="width=device-width, initial-scale=1" />
    <meta name="theme-color" content="#000000" />
    <meta
      name="description"
      content="Web site created using create-react-app"
    />
    <title>React App</title>
  </head>
  <body>
    <div id="root"></div>
  </body>
</html>注:%PUBLIC_URL%是process.env中的属性,react脚手架可以读到当前项目的publicdir路径,之后由react-scripts读取到并替换为publicdir
组件化编码流程
一个完整的组件化编码大致分为这几点:
- 拆分组件:拆分界面,抽取组件
- 实现静态组件:使用组件实现静态页面效果
- 实现动态组件
- 动态显示初始化数据
- 数据类型
- 数据名称
- 数据保存位置
- 交互(从侦听数据开始)
- 动态显示初始化数据
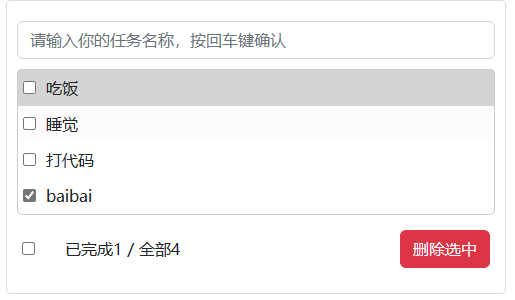
组件化编码之ToDoList案例
案例下载:https://kanokano.cn/wp-content/uploads/2023/05/ToDoList.zip
第三章 使用React发送AJAX请求
React和Vue一样,不会内置发送ajax请求的代码,需要自行构建或者使用第三方库(fetch或者axios)
使用axios
在react中使用axios和在Vue中没有太大的区别,首先都需要安装axios:
npm i axios --save示例代码:
import React, { Component } from "react";
import axios from "axios";
class App extends Component {
  getStudentData = () => {
    axios.get("http://localhost:3000/v1/students").then(
      (response) => {
        console.log("data:", response.data);
      },
      (error) => {
        console.log("err:", error);
      }
    );
  };
  getCarData = () => {
    axios.get("http://localhost:3000/v2/cars").then(
      (response) => {
        console.log("data:", response.data);
      },
      (error) => {
        console.log("err:", error);
      }
    );
  };
  render() {
    return (
      <div>
        <button onClick={this.getStudentData}>点我获取学生数据</button>
        <button onClick={this.getCarData}>点我获取汽车数据</button>
      </div>
    );
  }
}
export default App;
配置代理服务器
配置代理服务器的目的是为了解决浏览器的跨域请求问题
配置方法:直接在src目录下新建setupProxy.js文件:
const { createProxyMiddleware } = require("http-proxy-middleware");
//创建代理中间件
module.exports = (app) => {
    //可以配置多个代理服务器
    app.use(
        createProxyMiddleware("/v1", {
            target: "http://localhost:5000",
            changeOrigin: true,
            pathRewrite: { "^/v1": "" },
        })
    );
    app.use(
        createProxyMiddleware("/v2", {
            target: "http://localhost:5001",
            changeOrigin: true,
            pathRewrite: { "^/v2": "" },
        })
    );
};
还有一个简单的方法,适用于配置单个代理服务器:
在package.json中追加以下配置
"proxy":"http://xxxxx:xxx"这个方法有点就是配置简单,前端没有的请求统统走proxy
缺点就是不能配置多个代理,而且如果前端有的请求,不能手动指定请求到后端,不便于管理和控制
使用Pubsub优化现有代码
通过前面的实例我们可以发现,每当组件之间需要传递参数,特别是兄弟组件之间需要传递参数的时候,通常只能借助父组件作为传值的中间节点,这样其实不是很优雅,也会增加不必要的代码量,所以我们可以利用设计模式中的发布订阅模式来解决这个问题。
PubSub这个插件刚好就是利用了发布订阅模式,我们可以直接安装使用:
npm i pubsub-js --save使用Pubsub
订阅与取消订阅:
import PubSub from "pubsub-js";
...
componentDidMount() {
    this.token = PubSub.subscribe("onSearch", (msg, data) => {
        this.setState({
            list: data,
        });
    });
    this.token1 = PubSub.subscribe("toggleLoading", (msg, flag) => {
        this.setState({ loading: flag });
    });
}
//销毁组件之前记得取消订阅
componentWillUnmount(){
    PubSub.unsubscribe(this.token)
    PubSub.unsubscribe(this.token1)
}
...
发布:
import PubSub from "pubsub-js";
search = async () => {
    //连续解构
    const {
        current: { value },
    } = this.keyWord;
    //发送请求
    try {
        PubSub.publish("toggleLoading", true);
        const res = await axios.get(
            `https://api.github.com/search/users?q=${value}`
        );
        const list = res.data.items || [];
        //更新数据
        PubSub.publish("toggleLoading", false);
        PubSub.publish("onSearch", list);
    } catch (err) {
        console.log(err.message);
        PubSub.publish("toggleLoading", false);
    }
};
使用fetch
fetch作为一个新ajax的解决方案,自然也有他自己的优点,比如原生支持promise,符合关注分离的原则
直接上最简单的案例:
try {
    const res = await fetch(`https://api.github.com/search/users?q=${value}`);
    if (res.status === 200) {
        const list = (await res.json()).items || [];
    }
} catch (err) {
    console.log(err.message);
}
可以看到,使用原生的fetch也可以和axios之类的二次封装xhr一样优雅,我的评价是建议多用,都3202年了,兼容性都不是问题(
第四章 React路由
由于现在前端开发的大多都是单页面应用(SPA),自然就会用到路由。
路由分为hash实现和history实现,hash的兼容性更高,但不优雅,history更现代友好...
关于路由的概念这里就不过多阐述了,直接上正题
使用react-router5
注意,这里使用的是老版本的react-router (v5)
安装:
npm i react-router-dom@5使用router:
index.js
....
//引入router
import { BrowserRouter } from "react-router-dom";
const root = ReactDOM.createRoot(document.getElementById("root"));
//直接对整个App包裹BroserRouter或者HashRouter
root.render(
  <BrowserRouter>
    <App />
  </BrowserRouter>
);
....
App.jsx
import React, { Component } from "react";
import { Link, Route } from "react-router-dom";
import Home from "./components/Home";
import About from "./components/About";
class App extends Component {
    render() {
        return (
            ...
            {/* React中的切换链接方式 */}
            <Link to="/about" className="list-group-item active">
                About
            </Link>
            <Link to="/home" className="list-group-item ">
                Home
            </Link>
            <div>
                {/*当然,component内可以单独引入一个组件,这里为了方便,就用函数组件代替了*/}
                <Route path="/about" component={()=><h2>About</h2>} />
                <Route path="/home" component={()=><h2>Home</h2>} />
            </div>
            ...
        );
    }
}
export default App;
上面的link在切换的时候不会切换高亮状态,所以我们可以换成NavLink(别忘记import):
{/* 使用NavLink 点击谁就会加上activeClassName内指定的类名*/}
<NavLink activeClassName="active" to="/about" className="list-group-item">
    About
</NavLink>
<NavLink activeClassName="active" to="/home" className="list-group-item ">
    Home
</NavLink>
看完了上面的例子,可以分析出路由的基本使用大致可以包括这四步:
- 先进行界面分区布局
- a标签改为Link标签
- 在指定区域使用Route标签,并进行路由匹配
- 在根组件外侧包裹
<BrowserRouter />或者<HashRouter />
当然,上面的例子并没有进行组件细分,一般情况下,我们需要将静态组件拆分到src/components文件夹下,路由组件放在src/pages文件夹下
注意,路由组件在渲染的时候,内部会得到几个props传递的参数,分别如下:
{
    history: {
        action: "PUSH",
        block: ƒ block(prompt),
        createHref: ƒ createHref(location),
        go: ƒ go(n),
        goBack: ƒ goBack(),
        goForward: ƒ goForward(),
        length: 45,
        listen: ƒ listen(listener),
        location: {
            pathname: '/home',
            search: '',
            hash: '',
            state: undefined,
            key: 'faavc8'
        }
        push: ƒ push(path, state)
        replace: ƒ replace(path, state)
    }
    location: {
        hash: ""
        key: "faavc8"
        pathname: "/home"
        search: ""
        state: undefined
    }
    match: {
        path: '/home',
        url: '/home',
        isExact: true,
        params: {…}
    }
    staticContext: undefined
}
先别急,这里面的参数含义将会在后面通过例子逐一分析。
二次封装NavLink
上面我们使用了NavLink组件,我们会发现每次传递的参数个数还是比较多的,这该怎么优化呢?
<NavLink activeClassName="active" to="/home" className="list-group-item ">
    Home
</NavLink>
答案是二次封装它!
MyNavLink.jsx
import React, { Component } from "react";
import { NavLink } from "react-router-dom";
class MyNavLink extends Component {
  render() {
    //props的children可以拿到传过来的标签体内容
    const { to, children } = this.props;
    console.log(this.props);
    return (
      <NavLink
        activeClassName="active"
        to={to}
        // 也可以直接展开(children也可以写在标签属性内)
        //{...this.props}
        className="list-group-item "
      >
        {children}
      </NavLink>
    );
  }
}
export default MyNavLink;
App.jsx
{/* 封装NavLink */}
<MyNavLink to="/about">About</MyNavLink>
<MyNavLink to="/home">Home</MyNavLink>上面使用到了一个之前没有提到的props属性:children
children就是组件在标签之间传入的值,上面传入的是字符About和Home,所以children里就是About、Home
如果传入的是组件,那么children内就是一个组件。
总之就是标签之间传入的是什么,children内装的就是什么
children属性可以写在标签体内作为属性,也可以放在标签之间
Switch组件
正常情况下,一个路径对应一个组件。
有时候我们会写很多路由组件,组件解析的时候会从上往下逐次解析,如果遇到同路径路由会怎么样呢
下面的三个路由参杂了同路径的路由,进入/home路径时候,两个组件都会被解析到:
<Route path="/about" component={About} />
<Route path="/home" component={Home} />
<Route path="/home" component={()=><p>FAKE</p>} />这时候我们可以引入Switch组件。import {Switch} from 'react-router-dom'
加上了Switch组件之后,同路径路由只会匹配从上往下最近的一个(Home),多余的不会进行匹配:
<Switch>
    <Route path="/about" component={About} />
    <Route path="/home" component={Home} />
    <Route path="/home" component={()=><p>FAKE</p>} />
</Switch>
Switch可以保证路由的组件单一性
路由的模糊匹配
默认情况下路由默认会进行前缀模糊匹配:
{/* 封装NavLink */}
<MyNavLink to="/about">About</MyNavLink>
{/*可以跳转到home路由*/}
<MyNavLink to="/home/home1">Home</MyNavLink>
<Switch>
    <Route path="/about" component={About} />
    <Route path="/home" component={Home} />
</Switch>
开启了严格模式之后的路由将会进行严格匹配:
{/* 封装NavLink */}
<MyNavLink to="/about">About</MyNavLink>
{/*开启了严格模式后无法跳转到home路由了*/}
<MyNavLink to="/home/home1">Home</MyNavLink>
<Switch>
    {/*开启了严格模式*/}
    <Route exact path="/about" component={About} />
    <Route exact path="/home" component={Home} />
</Switch>
注意:一般情况下不需要开启路由的严格匹配,尤其是路径后面还跟随query参数的时候
而且严格匹配开启了还会导致无法继续匹配二级路由
Redirect的使用
一般情况下,如果用户请求了不存在的路由,React将什么也不会匹配,显示空白页面,这样并不优雅,这时候可以使用Redirect组件
redirect组件一般写在所有路由注册的最下方,当所有路由都无法匹配的时候,就会跳转到Redirect指定的路由
具体写法(记得import):
<Switch>
    <Route exact path="/about" component={About} />
    <Route exact path="/home" component={Home} />
    {/* 啥也没有默认去home */}
    <Redirect to="/home" />
</Switch>
嵌套路由
在React中,嵌套路由做法是比较简单的,只需要区分好父子组件的关系,然后注意以下两点:
- 注册子路由时写上父路由的path值
- 路由的匹配是按照注册路由的顺序进行的
- 以上的路由路径写法确实比较冗余,所以在后面的v6版本之后进行了改进,详细后面的章节会讲到
话不多说,直接上案例:
父路由如下设置:
/src/pages/Home/index.jsx
import React, { Component } from "react";
import { Route, Switch } from "react-router-dom";
import MyNavLink from "../../components/MyNavLink";
import Message from "./Message";
import News from "./News";
class Home extends Component {
  render() {
    console.log("Home渲染的props:", this.props);
    return (
      <div>
        <h3>我是Home内容</h3>
        <ul className="nav nav-tabs">
          <li>
            {/* 二级路由的写法 */}
            <MyNavLink to="/home/news" className="list-group-item active">
              News
            </MyNavLink>
          </li>
          <li>
            <MyNavLink to="/home/message" className="list-group-item">
              Message
            </MyNavLink>
          </li>
        </ul>
        {/* 注册路由 */}
        <Switch>
          <Route path="/home/news" component={News}></Route>
          <Route path="/home/message" component={Message}></Route>
        </Switch>
      </div>
    );
  }
}
export default Home;
子路由的设置(这里只展示Message组件,News组件同理):
/src/pages/Home/Message/index.jsx
import React, { Component } from "react";
class Message extends Component {
  render() {
    return (
      <div>
        <ul>
          <li>
            <a href="/">message001</a>
          </li>
          <li>
            <a href="/">message002</a>
          </li>
          <li>
            <a href="/">message003</a>
          </li>
        </ul>
      </div>
    );
  }
}
export default Message;
向路由组件传递参数
向路由组件传递params参数
路由传递params参数其实很简单,只需要在注册路由时加上占位符
:xxx即可,下面是详细步骤
- 首先在路由链接中携带参数 (
/home/message/detail/${obj.id}/${obj.title}) - 注册路由的时候需要声明参数 (
xxx/:id/:title) - 在目标路由中需要接收参数 (
props.match.params)
示例:
/src/pages/Home/Message/index.jsx
import React, { Component } from "react";
import Detail from "./Detail";
import { Link, Route } from "react-router-dom";
const data = [
  { id: "01", title: "消息1" },
  { id: "02", title: "消息2" },
];
class Message extends Component {
  render() {
    return (
      <div>
        <ul>
          {data.map((obj) => {
            return (
              <li key={obj.id}>
                {/* 像路由组件传递params参数 */}
                <Link to={`/home/message/detail/${obj.id}/${obj.title}`}>
                  {obj.title}
                </Link>
              </li>
            );
          })}
        </ul>
        <hr />
        {/* 声明接受params参数 */}
        <Route path="/home/message/detail/:id/:title" component={Detail} />
      </div>
    );
  }
}
export default Message;
/src/pages/Home/Message/Detail/index.jsx
import React, { Component } from "react";
const data = [
  { id: "01", content: "hahaha" },
  { id: "02", content: "kanokano.cn" },
];
class Detail extends Component {
  render() {
    // 传过来的params
    console.log(this.props.match.params);
    const { params } = this.props.match;
    const content = data.find((item) => {
      return item.id === params.id;
    });
    return (
      <ul>
        <li>ID:{params.id}</li>
        <li>title:{params.title}</li>
        <li>content:{content.content}</li>
      </ul>
    );
  }
}
export default Detail;
向路由组件传递search参数
传递seatch也就是query参数,通常长这样:
http://xxx.com?id=02&title=%E6%B6%88%E6%81%AF2?后面的字符串就是search(query)参数
在路由组件之间传递search参数很简单,只需要如下操作:
- 在路由链接中携带search参数:
to={/home/message/detail/?id=${obj.id}&title=${obj.title}} - 在目标路由组件中使用
props.location.search即可查看传入的search字符串 - 在目标路由组件中使用 query-string 插件中的
parse()方法即可转换urlencoded形式的search字符串为实体对象
注意,query-string插件需要手动安装:npm i query-string
具体代码:
源路由组件:
//...
const data = [
  { id: "01", title: "消息1" },
  { id: "02", title: "消息2" },
];
//...
{/* 像路由组件传递search(query)参数 */}
<Link to={`/home/message/detail/?id=${obj.id}&title=${obj.title}`}>
    {obj.title}
</Link>
{/* 无需声明search(query)参数 */}
<Route path="/home/message/detail" component={Detail} />
//...
目标路由组件:
//....
//npm i query-string
import qs from "query-string";
render() {
    // 传过来的query
    console.log("query", this.props.location);
    const { search } = this.props.location;
    //querystring需要转换成对象
    let out = qs.parse(search);
    console.log(out);
    const content = data.find((item) => {
      return item.id === out.id;
    });
    return (
      <ul>
        <li>ID:{out.id}</li>
        <li>title:{out.title}</li>
        <li>content:{content.content}</li>
      </ul>
    );
  }
//.....
向路由组件传递state参数
这种方法不会因为地址栏的改动而变化,信息不容易被随意篡改
源路由组件:
{/* 像路由组件传递state参数 */}
<Link
    to={{
        pathname: "/home/message/detail/",
            state: { id: obj.id, title: obj.title },
    }}
    >
    {obj.title}
</Link>
{/* 无需声明state参数 */}
<Route path="/home/message/detail" component={Detail} />
目标路由组件:
render() {
    // 传过来的state
    console.log("state", this.props);
    //因为state是保存在history里的,所以分享页面后不会保存state
    const { id, title } = this.props.location.state || {};
    const content =
          data.find((item) => {
              return item.id === id;
          }) || {};
    return (
        <ul>
            <li>ID:{id}</li>
            <li>title:{title}</li>
            <li>content:{content.content}</li>
        </ul>
    );
}问题:state参数并没有在浏览器地址栏体现,他是怎么做到刷新之后数据的持久保存的呢?
答:因为state是由window.history维护的,也就是BrowserRouter方式的路由,history帮我们记录了state对象的状态,如果换成HashRouter的话,state就不会保存了,刷新之后就会丢失state,但即使使用BrowserRouter,在更换标签页或者分享后,也会丢失state内容。所以state更适合于一次性传递数据的场景
replace和push
因为history是以栈的形式来存储历史记录的,即默认是push模式。
有时我们不想直接回退到之前的历史,我们就可以给对应的Link上添加replace属性,这样就可以开启replace模式了
<Link replace to="/home/kano/detail" >{obj.title}</Link>当我们依次进入home,kano然后点击链接进入detail,点击浏览器的后退按钮的时候,这时不会回到kano路由,而是直接回到home路由中,原因是replace模式已经替换掉了当前路径的history。
以上就是replace模式的link作用
编程式路由导航
前面我们使用的是组件维护的路由导航,编程式路由导航就是使用history中的方法来实现自定义路由跳转
//定义一个show方法,method可以自定义
show = (method, id, title) => {
    //replace跳转(编程式路由导航)
    //params
    this.props.history[method](`/home/message/detail/${id}/${title}`);
    //search
    // this.props.history[method](`/home/message/detail/?id=${id}&title=${title}`);
    //state
    // this.props.history[method]("/home/message/detail/", { id, title });
};
//.....
<Link to={`/home/message/detail/${obj.id}/${obj.title}`}>
    {obj.title}
</Link>
<button onClick={() => this.show("push", obj.id, obj.title)}>push查看</button>
<button onClick={() => this.show("replace", obj.id, obj.title)}>replace查看</button>
//.....
{/* 声明接受params参数 */}
<Route path="/home/message/detail/:id/:title" component={Detail} />

{/* 无需声明search(query)参数 */}
{/* <Route path="/home/message/detail" component={Detail} /> */}

{/* 无需声明state参数 */}
{/* <Route path="/home/message/detail" component={Detail} /> */}

<button onClick={()=>this.props.history.goForward()}>前进</button>
<button onClick={()=>this.props.history.goBack()}>后退</button>
<button onClick={()=>this.props.history.go(-2)}>后退2步</button>
上面使用了history.push 和 replace方法,可以传递params,query和state参数,甚至可以使用history操作前进和后退
在一般组件中使用router内的方法
我们知道,只有路由组件,也就是Route组件导航到的组件的props中才有history方法,但是如果我们需要在一般组件中使用路由的方法,那应该如何做呢?这时候我们就需要使用withRouter
import React, { Component } from "react";
// 在一般组件中使用router中的方法,需要引入withRouter
import { withRouter } from "react-router-dom";
class Header extends Component {
  render() {
    return (
      <div className="row">
        <div className="col-offset-2 col-8">
          <div className="page-header">
            <h2>React Router Demo</h2>
            <button onClick={() => this.props.history.goForward()}>前进</button>
            <button onClick={() => this.props.history.goBack()}>后退</button>
            <button onClick={() => this.props.history.go(-2)}>后退2</button>
          </div>
        </div>
        <hr />
      </div>
    );
  }
}
//一般组件加上路由的方法
export default withRouter(Header);
如上,只需要引入withRouter,然后导出组件的时候,使用withRouter包裹组件类,就可以在props中使用history了
总结:
- withRouter可以加工一个一般组件,让一般组件具备路由组件所特有的API
- withRouter的返回值是一个新组件。
BrowserRouter和HashRouter的区别
- 底层原理不一样:
- browserRouter使用的是H5的historyAPI,不兼容IE9以下版本(IE已死)
- hashRouter使用的是URL的哈希值
- url表现形式不一样
- browserRouter的路径中没有#,hashRouter路径中有#
- 刷新后对路由state参数的影响
- browserRouter没有任何影响,因为state保存在history对象中
- HashRouter刷新后会导致state参数的丢失
- HashRouter可以在兼容性遇到问题,或者是路径错误的环境下使用,正常情况browserRouter即可
EX章节:AntDesign
相对于Vue国内生态的ElementUI组件库,React国内也有相对应的组件库AntDesign
安装
$ npm install antd --save$ yarn add antd使用
import { Button, Space, DatePicker } from "antd";
//图标
import { WechatFilled, SearchOutlined } from "@ant-design/icons";
const onChange = (date, dateString) => {
  console.log(date, dateString);
};
const App = () => (
  <Space wrap>
    <DatePicker onChange={onChange} />
    <WechatFilled spin />
    <WechatFilled />
    <Button type="primary">Primary Button</Button>
    <Button type="primary" icon={<SearchOutlined />} />
    <Button>Default Button</Button>
    <Button type="dashed">Dashed Button</Button>
    <Button type="text">Text Button</Button>
    <Button type="link">Link Button</Button>
  </Space>
);
export default App;之后就不详细阐述AntD的组件库的使用了,详情只需要点击文档查看即可:https://ant.design/components/
按需加载(antd 3.x)
antd新版本(4.x +)已经默认支持按需加载(基于 ES module 的 tree shaking),无需额外配置,不过如遇到问题,也可以按照下面的方法进行按需加载配置(FROM:Ant Design 3.x)
1.使用react-app-rewired
引入 react-app-rewired 并修改 package.json 里的启动配置。由于新的 react-app-rewired@2.x 版本的关系,你还需要安装 customize-cra。
$ yarn add react-app-rewired customize-cra
/* package.json */
"scripts": {
-   "start": "react-scripts start",
+   "start": "react-app-rewired start",
-   "build": "react-scripts build",
+   "build": "react-app-rewired build",
-   "test": "react-scripts test",
+   "test": "react-app-rewired test",
}
然后在项目根目录创建一个 config-overrides.js 用于修改默认配置。
module.exports = function override(config, env) {
  // do stuff with the webpack config...
  return config;
};
2.使用babel-plugin-import进行按需引入
babel-plugin-import 是一个用于按需加载组件代码和样式的 babel 插件(原理),现在我们尝试安装它并修改 config-overrides.js 文件。
$ yarn add babel-plugin-import+ const { override, fixBabelImports } = require('customize-cra');
- module.exports = function override(config, env) {
- // do stuff with the webpack config...
- return config;
- };
+ module.exports = override(
+ fixBabelImports('import', {
+ libraryName: 'antd',
+ libraryDirectory: 'es',
+ style: 'css',
+ }),
+ );然后移除前面在 src/App.css 里全量添加的 @import '~antd/dist/antd.css'; 样式代码,并且按下面的格式引入模块。
  // src/App.js
  import React, { Component } from 'react';
- import Button from 'antd/es/button';
+ import { Button } from 'antd';
  import './App.css';

  class App extends Component {
    render() {
      return (
        <div className="App">
          <Button type="primary">Button</Button>
        </div>
      );
    }
  }

  export default App;
最后重启 yarn start 访问页面,antd 组件的 js 和 css 代码都会按需加载,你在控制台也不会看到这样的警告信息。关于按需加载的原理和其他方式可以阅读这里。
import DatePicker from 'antd/es/date-picker'; // 加载 JS
import 'antd/es/dte-picker/style/css'; // 加载 CSS
// import 'antd/es/date-picker/style';         // 加载 LESS
自定义主题(antd 5.x)
5.x自定义主题详见:定制主题 - Ant Design5
3.x自定义主题详见:定制主题 - Ant Design3
第五章 Redux
Redux是一个专门用于做状态管理的JS库(并不是React插件库)
它可以用在react、angular、vue等项目中,但常与react配合使用(可能试试名字比较契合x)
作用:集中式管理react应用中多个组件共享的状态
什么情况下需要使用到redux
- 某个组件的状态需要让其他组件随时拿到(也就是共享)
- 一个罪案需要改变另一个组件的状态(通信)
- 总体原则:按照业务需求,也就是按需使用
工作流程
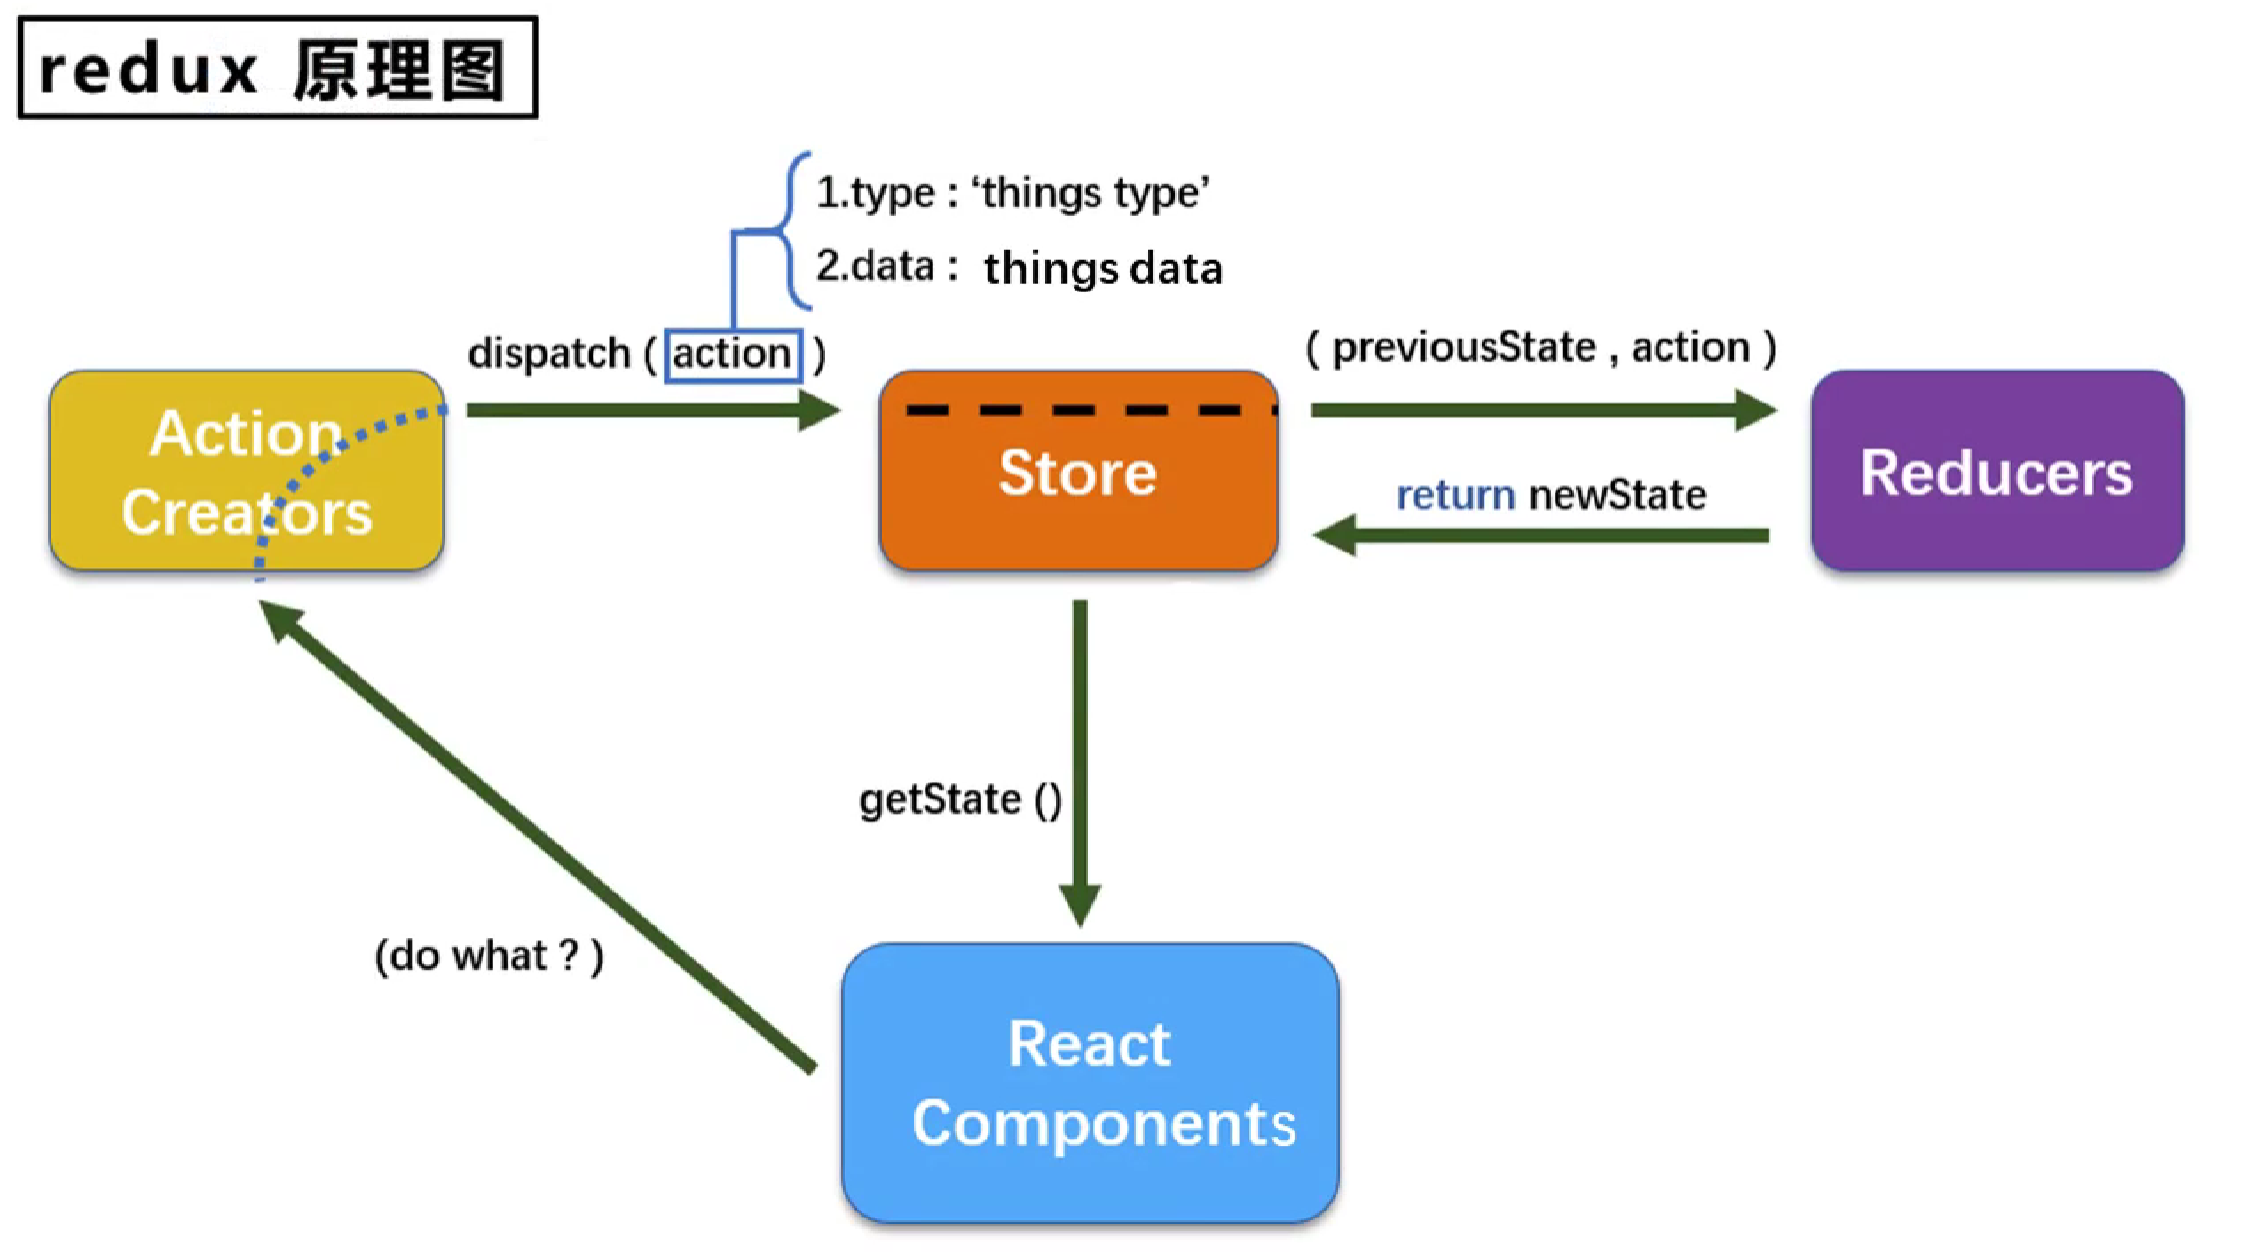
看上去和vuex比较像(State Action Mutation),实际上确实如此,redux的三个核心对象的解释如下:
- action
- 是动作的对象,包含两个属性
- type:标识属性,值为字符串,唯一,必要属性
- data:数据属性,值类型任意,可选属性
- 示例:
{type:'ADD_STUDENT,data:{name:'tom',age:18}'}
- 是动作的对象,包含两个属性
- reducer
- 用于初始化状态,加工状态
- 加工时根据旧的
state和action,产生新的state的纯函数
- store
- 将state、action、reducer联系在一起的对象
- 如何得到此对象?
import {createStore} from 'redux'import reducer from './reducers'const store = createStore(reducer)
- 此对象的功能?
getState():得到statedispatch(action):分发action,触发reducer调用,产生新的statesubscribe(listener):注册监听,当产生了新的state时,自动调用
安装使用
npn i redux具体使用方法我们可以通过下面的redux求和案例来一一阐述
一个简单的redux例子
Count组件:components/Count/index.jsx
import React, { Component } from "react";
//store
import store from "../../redux/store";
//actions
import {
  createIncrementAction,
  createDecrementAction,
  createIncrementAsyncAction,
} from "../../redux/count_action";
class Count extends Component {
  //加法
  increment = () => {
    const { value } = this.selectedNumber;
    store.dispatch(createIncrementAction(+value));
  };
  //减法
  decrement = () => {
    const { value } = this.selectedNumber;
    store.dispatch(createDecrementAction(+value));
  };
  //奇数加
  incrementOdd = () => {
    const { value } = this.selectedNumber;
    store.getState() % 2 !== 0 && store.dispatch(createIncrementAction(+value));
  };
  //异步加
  incrementAsync = () => {
    const { value } = this.selectedNumber;
    //延迟函数写在Action里更方便管理
    store.dispatch(createIncrementAsyncAction(+value, 500));
  };

  //放到了index.js中统一监测,更方便
  //   componentDidMount() {
  //     //检测redux中的状态的变化,只要变化,就调用render
  //     store.subscribe(() => {
  //       this.forceUpdate();
  //       //或者使用setState假更新
  //       //   this.setState({})
  //     });
  //   }

  render() {
    return (
      <div>
        <h1>当前求和为:{store.getState()}</h1>
        <select
          ref={(c) => (this.selectedNumber = c)}
          style={{ width: 50, textAlign: "center" }}
        >
          <option value="1">1</option>
          <option value="2">2</option>
          <option value="3">3</option>
        </select>
        <button onClick={this.increment} style={{ margin: "0 5px" }}>
          +
        </button>
        <button onClick={this.decrement} style={{ margin: "0 5px" }}>
          -
        </button>
        <button onClick={this.incrementOdd} style={{ margin: "0 5px" }}>
          奇数+
        </button>
        <button onClick={this.incrementAsync} style={{ margin: "0 5px" }}>
          sync+
        </button>
      </div>
    );
  }
}
export default Count;在src目录下新建redux文件夹,然后在redux文件夹下新建store.js,count_reducer.js,分别作为store和reducer
注意:createStore为过时写法,但可以使用legacy_createStore创建store对象
store主文件:store.js
这里需要使用thunk中间件,安装方法:
npm i redux-thunk,原因下面会提到
//过时写法,创建store对象
import { legacy_createStore as createStore, applyMiddleware } from "redux";
import countReducer from "./count_reducer";

//redux-thunk 用于支持异步action
import thunk from "redux-thunk";

//使用store,并且使用thunk中间件
const store = createStore(countReducer, applyMiddleware(thunk));
export default store;常量标识符文件:src\redux\constant.js
因为action的type为字符串类型,在编写代码的时候很容易写错,我们可以单独新建一个js来管理这些字符串
// 该模块用于定义action对象中type类型的常量值,因为变量自带智能提示,可以防手贱写错
export const INCREMENT = "increment";
export const DECREMENT = "decrement";reducers:src\redux\reducers\count.js
reducer就是一个函数,相当于vuex的mutations,接受preState,action,返回加工后的state
总的来说,reducer的职责就是初始化状态,加工状态注意!!,这里可能会遇到一个坑,如果我们的initState保存的是引用类型的数据(比如数组),我们在结合prevState时候就需要想办法创建一个新数组来替换掉之前的数组(使用解构,或者创建一个新数组,都可),具体看下面的例子:
// reducer就是一个函数,相当于vuex的mutations
//两个参数,之前的state和动作对象
import { INCREMENT, DECREMENT } from "./constant";

const initState = 0; //初始化状态
export default function countReducer(prevState = initState, action) {
    //提取action中的type和data
    const { type, data } = action;
    console.log(action);
    switch (type) {
        case INCREMENT:
            return prevState + data;
        case DECREMENT:
            return prevState - data;
        default:
            return prevState;
    }
}
//....
//添加一个状态
const initState = [{ id: "001", name: "tom", age: 18 }];
export default function personReducer(prevState = initState, action) {
const { type, data } = action;
switch (type) {
case ADD_PERSON:
//这里一定要返回一个新的数组,这样才会触发render重绘界面
//render之前触发的是浅比较
return [data, ...prevState];
//以下的做法不会触发页面重绘
//prevState.unshift(data)
//return prevState
default:
return prevState;
}
}actions:src\redux\actions\count.js
redux中的action分为同步和异步,同步的通常就是一个对象:
{type:xxx,data:data}
异步action通常是一个函数,但是原生的redux的dispatch是无法接受函数作为参数的,所以我们就会使用到一个中间件:redux-thunk
这时候在写action的时候就可以返回一个函数,函数默认会传入被触发组件实例的dispatch方法,方便我们进一步更新state
// 为count组件生成action对象
import { INCREMENT, DECREMENT } from "./constant";
export const createIncrementAction = (data) => ({
    type: INCREMENT,
    data,
});

export const createDecrementAction = (data) => ({
    type: DECREMENT,
    data,
});

//异步action
//需要安装 npm i redux-thunk (转换程序) 这样dispatch才能接收异步函数
//这样返回的函数就会加上一个dispatch参数供我们使用
export const createIncrementAsyncAction = (data, time) => (dispatch) => {
    setTimeout(() => {
        dispatch(createIncrementAction(data));
    }, time);
};
以上就是一个简单的使用redux管理的求和案例,我们可以看到几个细节:
store.getState()虽然可以取得对应的state,但是并不具备响应式效果,也就是说使用dispatch方法之后,并不会使页面自动更新,我们可以借助componentDidMount钩子,在里面强制更新页面状态(使用this.setState({})或者this.forceUpdate())- 在
reducer函数中,prevState如果不设初值的话,默认为undefined - 在
reducer函数第一次初始化的时候action中的type属性默认为@@redux/INIT加上一串随机字符 constant.js模块用于定义action对象中type类型的常量值,因为导出的变量自带智能提示,可以防手贱写错- 在编写异步actions时候,一定要记住,在
store.js中使用applyMiddleware(thunk)作为createStore的第二参数,导入中间件到redux store中.
注意,第1点的强制更新操作其实有更好的写法,那就是直接写在index.js中,基本不会有性能损失,如下
src/index.js
//...import....
import store from "./redux/store";
const root = ReactDOM.createRoot(document.getElementById("root"));
root.render(<App />);

//在这里更新也可以,不会造成性能损失(有diff算法)
store.subscribe(() => {
    root.render(<App />);
});
react-redux
看完了上面的例子,我们可以发现,redux好像并不是很好用,尤其是使用异步actions还需要额外安装插件,很不方便
所以这个小节我们使用一个新的插件:react-redux这个redux是专门为react而生的,也是由redux团队维护
react-redux的基本要素如下:
- 所有的UI组件都应该包裹一个容器组件,他们是父子关系
- 容器组件是真正和redux打交道的,里面可以随意使用redux的api
- UI组件中不能使用任何redux的api
- 容器组件会传给UI组件:
- redux中所保存的状态
- 用于操作状态的方法
- 备注:容器给UI传递:状态、操作状态的方法,均通过props传递
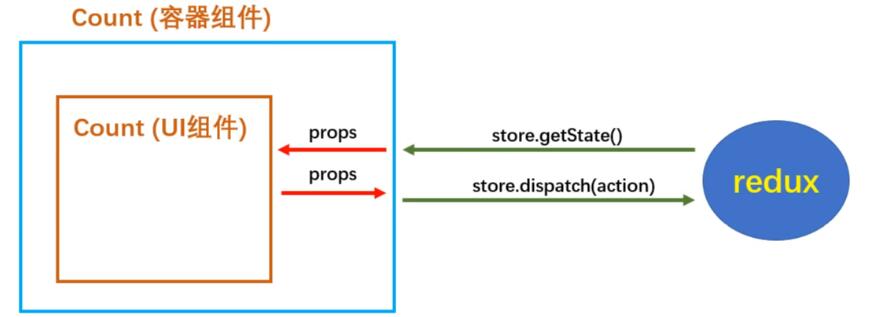
从上面的概述可以看出,react-redux就是为react优化了写法的redux,使用了容器组件把redux中的方法和ui组件隔离开
使用react-redux
首先安装:
npm i react-redux下面我们使用之前用到的redux加法案例来演示react-redux的基本用法
在src目录下添加containers文件夹,用于存放容器组件,创建Count容器组件(src/containers/Count/index.jsx):
大致步骤:
- 引入
react-redux - 引入UI组件
- 引入
actions - 编写
mapStateToProps与mapDispatchToProps函数 - 使用
react-redux导出的connect方法,并将mapStateToProps与mapDispatchToProps作为第一阶函数的参数传入,UI组件作为第二阶函数的参数传入
//引入Count的UI组件
import CountUI from "../../components/Count";
//引入connect用于连接UI组件与redux
import { connect } from "react-redux";
//引入action
import {
  createIncrementAction,
  createDecrementAction,
  createIncrementAsyncAction,
} from "../../redux/actions/count";
//这里写传入CountUI的props(参数默认传入的是state)
function mapStateToProps(state) {
  return {
    count: state,
  };
}
//这里写传入CountUI的方法(参数默认传入的是dispatch)
function mapDispatchToProps(dispatch) {
  return {
    plus: (number) => {
      //通知redux执行加法
      dispatch(createIncrementAction(number));
    },
    dec: (number) => {
      //通知redux执行减法
      dispatch(createDecrementAction(number));
    },
    asyncPlus: (number, delay) => {
      //通知redux执行异步加法
      dispatch(createIncrementAsyncAction(number, delay));
    },
  };
}
//mapStateToProps是状态映射为props的方法,mapDispatchToProps是dispatch映射为props的方法
//使用connect(mapStateToProps,mapDispatchToProps)(UIcomponent)创建并暴露一个Count的容器组件
export default connect(mapStateToProps, mapDispatchToProps)(CountUI);
//简单理解就是给原先的组件套上了一个redux的壳

//connect还可以进一步作成如下写法:
/*
    export default connect(
      (state) => ({
        count: state,
      }),
      (dispatch) => ({
        plus: (number) => {
          //通知redux执行加法
          dispatch(createIncrementAction(number));
        },
        dec: (number) => {
          //通知redux执行减法
          dispatch(createDecrementAction(number));
        },
        asyncPlus: (number, delay) => {
          //通知redux执行异步加法
          dispatch(createIncrementAsyncAction(number, delay));
        },
      })
    )(CountUI);
*/connect函数是一个高阶函数,也就是返回一个函数的函数。
connect函数接收了两个参数:
- 第一个是
mapStateToProps,它是一个函数,默认会传入一个state参数,顾名思义,就是将reducer生成的state映射到UI组件中的props上,返回值为一个对象。 - 第二个是
mapDispatchToProps,这也是一个函数,默认会传入一个dispatch参数,作用是将方法作为props映射到UI组件上,返回值也是一个对象。
此外,mapDispatchToProps参数还有更精简的写法,可以直接传入一个对象,value对应的是action:
//简写(react-redux自动调用dispatch进行分发
export default connect(
    (state) => ({
        count: state,
    }),
    {
        plus: createIncrementAction,
        dec: createDecrementAction,
        asyncPlus: createIncrementAsyncAction,
    }
)(CountUI);connect函数执行后,会返回一个新函数,这时我们需要将UI组件作为参数传递到这个新函数中,随后执行,就会生成一个容器组件。
以上就是一个简单的容器组件的写法,当然,光有容器组件还不行,我们还得在App中引入容器组件:
在App.jsx中就可以使用Count容器组件,并且容器组件可以传入store作为参数,这样redux与组件就完成了解耦:
import React, { Component } from "react";
//引入的应该是容器组件,而不是UI组件
import Count from "./containers/Count";
//store
import store from "./redux/store";
import { Provider } from "react-redux";
class App extends Component {
  render() {
    return (
      <div>
         {/* 使用provider对一个或者多个组件一次性地提供store */}
        <Provider store={store}>
          <Count />
        </Provider>
      </div>
    );
  }
}

export default App;
然后我们就可以在UI组件中使用props访问到我们刚才映射过来的方法和state了:
//components/Count
class Count extends Component {
    ....
    //加法
    increment = () => {
        const { value } = this.selectedNumber;
        this.props.plus(+value);
    };
    //减法
    decrement = () => {
        const { value } = this.selectedNumber;
        this.props.dec(+value);
    };
    //奇数加
    incrementOdd = () => {
        const { value } = this.selectedNumber;
        if (this.props.count % 2 !== 0) {
            this.props.plus(+value);
        }
    };
    //异步加
    incrementAsync = () => {
        const { value } = this.selectedNumber;
        this.props.asyncPlus(+value, 500);
    };
    ....
}注意,使用了react-redux后,我们不需要在index.js中检测redux中状态的改变了,这是因为容器组件已经帮我们自动完成了这个工作:
// import React from "react";
import ReactDOM from "react-dom/client";
import App from "./App";
import "./index.css";
const root = ReactDOM.createRoot(document.getElementById("root"));
root.render(<App />);
//用上了react-redux就不用自己手写检测了
// store.subscribe(() => {
//   root.render(<App />);
// });
以上就是react-redux的基本使用方法,细心的你可能会发现,我在写ui组件与容器组件的时候,是在不同的目录下分别编写的,如果ui组件特别多的话,容器组件也会变多,这样文件数目就会成倍增长,不利于后面的代码组织,所以我们在实际开发的时候,会将ui组件与容器组件放在同一个jsx文件中:
src/containers/Count/index.jsx
import React, { Component } from "react";
//引入connect用于连接UI组件与redux
import { connect } from "react-redux";
//引入action
import {
  createIncrementAction,
  createDecrementAction,
  createIncrementAsyncAction,
} from "../../redux/actions/count";
class Count extends Component {
  //.....
}

export default connect(
  (state) => ({
    count: state,
  }),
  //简写(react-redux自动调用dispatch进行分发
  {
    plus: createIncrementAction,
    dec: createDecrementAction,
    asyncPlus: createIncrementAsyncAction,
  }
)(Count);
react-redux多组件
通过上面的学习,我们已经基本了解了react-redux的基本用法,但对于多组件的情况我们并没有进行演示。
对于多组件而言,我们需要一次性管理多个action,reducer,这时候就需要进行目录划分,还有状态汇总:
对于一个成熟的工程来说,redux目录划分是这样的:
-redux
|-  - actions
|-      - count.js
|-      - person.js
|-  - reducers
|-      - count.js
|-      - person.js
|-  - constant.js
|- - store.js对于多个reducer,我们需要将其汇总成一起,这时候我们就需要借助react-redux中的combineReducers函数:
store.js
import {
  legacy_createStore as createStore,
  applyMiddleware,
  combineReducers,
} from "redux";
import countReducer from "./reducers/count";
import personReducer from "./reducers/person";
//redux-thunk 用于支持异步action
import thunk from "redux-thunk";

//将多个状态存储为状态(汇总)
const allReducer = combineReducers({
  count: countReducer,
  persons: personReducer,
});
//使用store,并且使用thunk中间件
const store = createStore(allReducer, applyMiddleware(thunk));

export default store;这时allReducer就变成了一个包含count和persons状态的对象,我们使用的时候就需要在connect函数中的mapPropsToState函数进行对象访问:
//...
export default connect(
  (state) => ({
    persons: state.persons,
    personLen: state.persons.length,
  }),
  {
    add: createAddPersonAction,
  }
)(Person);
使用
combineReducers合并的state有一个好处就是:合并后的state可以在任意组件中互相使用,自由度非常高
以上就是react-redux中多组件的基本写法,总结以下四个步骤:
- 定义一个
Person组件,和Count组件,通过react-redux共享数据 - 为
Person组件编写:reducer,action,并配置constant常量 Person的reducer和Count的Reducer需要使用combineReducers进行整合,合并之后的的总状态是一个对象!- 交给
store的总是reducer,最后注意在组件中取出状态的时候,记得传入的state是一个对象,需要取出对象中的属性才是对应的state
纯函数与高阶函数
纯函数
- 一类特别的函数:只要是同样的输入(实参),必定得到同样的返回
- 必须遵守以下一些约束
- 不得改写参数数据
- 不会产生任何副作用,例如网络请求,输入和输出设备
- 不能调用
Date.now()或者Math.random()等不纯的方法
redux的reducer函数必须是一个纯函数
对于第三点,reducer函数必须是一个纯函数的理解,我们在上面的例子中有提到,
reducer中的initState如果是一个引用类型(例如数组)我们在操作preState的时候不可以改变这个变量(比如使用push,pop,unshift 方法),一是因为会无法触发render重绘,二是因为破坏了reducer函数必须是纯函数的原则
高阶函数
- 理解:是一类特别的函数
- 情况一:参数是函数
- 情况2:返回是函数
- 常见的高阶函数
- 定时器设置函数
- 数组的
forEach(),map(),filter(),bind(),find()等
ReduxDevTools使用
ReduxDevTools是一个浏览器插件,可以方便我们管理和查看redux内部的reducers和actions
对于浏览器:首先去浏览器应用商店搜索ReduxDevTools扩展,安装即可
ReduxDevTools有一个对应的react插件需要我们安装并引入:
npm i redux-devtools-extension在store.js中应用插件:
//...
//引入'redux-devtools-extension'
import { composeWithDevTools } from "redux-devtools-extension";
//...
//使用composeDevTools作为createStore的第二参数,composeWithDevTools函数内的参数再嵌套其他需要应用的中间件
const store = createStore(
  allReducer,
  composeWithDevTools(applyMiddleware(thunk))
);
//....
打包项目并上线
项目编写完毕就就需要进行打包编译操作,把jsx转换为js文件和html文件:
首先执行编译操作:
npm run build编译完毕后根目录下会生成
build文件夹,里面就是我们生成的完整网页了
第六章 React新增扩展
setState
setState更新状态的的两种写法
对象式语法糖写法
setState(stateChange [callBack]------对象式的setState)
stateChange为状态改变对象(该对象可以体现出状态的更改)callback为可选的回调函数,它在状态更新完毕,界面更新后(render调用后)才被调用
//语法糖写法
//更新状态是异步的
this.setState({ count: count + 1 });
this.setState({ count: count + 1 }, () => {
    //状态更新完毕后的回调函数
    console.log(this.state.count);
});
函数式返回值写法
setState(updater,[callBack]) ----- 函数式的setState
- updater为返回stateChange对象的函数
- updater可以接收到state和props
- callback是可选的回调函数,它在状态更新,界面更新后(reder调用后)才被调用
//函数式写法
this.setState(
    (state, props) => {
        return {
            count: state.count + 1,
        };
    },
    () => {
        console.log(this.state);
    }
);
总结
- 对象式的setState式函数式的setState的简写方式(语法糖)
- 使用原则:
- 如果新状态不依赖于原状态,就可以使用对象方式
- 如果新状态依赖于原状态,就可以使用函数方式
- 如果需要在setState()执行后获取最新的状态数据,要在第二个callback函数中读取
lazyLoad
React支持路由懒加载功能,需要引入lazy函数与Suspense组件(位于react包内)
引入需要使用的依赖,然后将需要进行懒加载的组件使用lazy函数包裹起来:
import React, { Component, Suspense, lazy } from "react";
// 懒加载
const Home = lazy(() => {
  return import("./Home");
});
const About = lazy(() => {
  return import("./About");
});
使用Suspense组件包裹,注意:加载过程中需要有一个fallback保底组件,一般是用来提示用户正在加载中,这个组件必须是正常引入的,而不是lazy方式引入的
{/* 懒加载,加载过程中需要有一个fallback保底组件,一般是用来提示用户正在加载中 */}
<Suspense fallback={<h1>Loading...</h1>}>
    <Route path="/about" component={About} />
    <Route path="/home" component={Home} />
</Suspense>
Hooks
1.React Hook/Hooks是什么?
- Hook是React 16.8版本新增的特性/语法
- 可以让你在函数组件中使用state以及其他的React特性
2.三个常用的Hook
- State Hook :
React.useState() - Effect Hook:
React.useEffect() - Ref Hook:
React.useRef()
State Hook
State Hook 让函数组件也可以有state状态,并进行状态数据的读写操作
语法:const [xxx,setxxx] = React.useState(initValue)
useState()说明:
- 参数:第一次初始化指定在内部,用作缓存
- 返回值:包含2个元素的数组,第一个为内部当前的状态值,第二个为更新状态值的函数
setXxx()的两种写法
setXxx(newValue):参数为非函数值,直接指定新的状态值,内部用其覆盖原来的状态值setXxx(value => newValue):参数为函数,接受原本的状态值,返回新的状态值,内部用其覆盖原来的状态值
使用方式:
import React from "react";
function Index() {
  //使用useState HOOK
  // 解构赋值,useState返回的是一个数组
  //这个hook的底层做了处理,不会因为Index函数再次调用导致覆盖原来的状态
  const [count, setCount] = React.useState(0);
  function update() {
    //第一种写法
    // setCount(count + 1);
    //第二种写法
    setCount((val) => val + 1);
  }
  return (
    <div>
      <h2>当前求和为:{count}</h2>
      <button onClick={update}>点我+1</button>
    </div>
  );
}

export default Index;
Effect Hook
Effect Hook 可以让你在函数组件中执行副作用操作(用于模拟类组件中生命周期钩子)
React中副作用操作:
- 发送ajax请求数据获取
- 设置订阅/启动定时器
- 手动更改真实DOM
语法和说明
useEffect 类似VUE中的watch,第二参数是一个数组,不写数组的时候就是全部监听(componentdidUpdate)
写一个空数组就是全都不监听(componentdidMount),但是第一次会执行
数组中写变量,就是监听特定的变量(componentDidUpdate)
React.useEffect(() => {
    //在此处可以执行任何带副作用操作
    console.log("$");
    let timer = setInterval(() => {
        update();
    }, 1000);
    //返回的函数相当与ComponentWillUnmount
    return () => {
        //在此处做一些收尾操作、比如清楚定时器,取消订阅等
        clearInterval(timer)
        console.log("###");
    };
}, []);//如果指定的是[],回调函数指挥在第一次render()之后执行
RefHook
Ref相关的Hook只有一个,那就是
useRef()
Ref Hook 可以在函数组件中存储/查找组件内的标签或任意其他数据
使用例:
import React from "react";
import ReactDOM from "react-dom";

function Index(props) {
  const myRef = React.useRef();
  //提示输入的回调
  function show(){
    alert(myRef.current.value)
  }
  return (
    <div>
      <input type="text" ref={myRef} />
      <button onClick={show}>点我提示数据</button>
    </div>
  );
}

export default Index;
3.其他Hook
Fragment
我们每次编写组件的时候,都会在最外层套一个div盒子,因为return的时候只能返回一个标签元素,所以最终渲染出来的DOM,在层级上会比较乱
我们有相应的解决方法,那就是Fragment,他起到了占位符的作用,实际不会渲染成DOM节点
使用Fragment生成html后不会实际占用元素,可以写key属性,可以遍历
render() {
    return (
        <Fragment>
            <input type="text" />
        </Fragment>
    );
}
除了使用
Fragment之外,我们还可以使用空标签作为占位符
但是这样有缺点,缺点就是空标签不能遍历,因为空标签上不允许添加任何属性
render() {
    return (
      <>
        <input type="text" />
      </>
    );
}
Context
理解:一种组件间通信方式,常用于【祖组件】与【后代组件】之间通信
使用:
1.创建Context容器对象
//创建Context对象
const MyContext = React.createContext();
2.渲染子组件时,外面包裹xxxContext.Provider,通过value属性给后代组件传递数据
class A extends Component {
  state = { username: "tom", age: 11 };
  render() {
    return (
      <div className="parent">
        <h3>我是A组件</h3>
        <h4>我的用户名是:{this.state.username}</h4>
        <h4>我的年龄是:{this.state.age}</h4>
        {/* 这样写了之后,B组件,以及他所有的子组件,都具备username属性了 */}
        <MyContext.Provider value={this.state}>
          <B />
        </MyContext.Provider>
      </div>
    );
  }
}
3.后代组件读取数据
只需要在类中声明静态的contextType,组件的context属性就会有传入的数据
class C extends Component {
  //谁想用就声明静态的contextType
  static contextType = MyContext;
  render() {
    console.log(this);
    return (
      <div className="grand">
        <h3>我是C组件</h3>
        <h4>我从A接受到的用户名:{this.context.username}</h4>
        <h4>我从A接受到的年龄:{this.context.age}</h4>
      </div>
    );
  }
}
但是上面的static声明无法在函数时式组件使用,所以介绍另一种方法,就是组件:
MyContext.Consumer
这个方法的好处是函数组件和类组件都可以使用,缺点是写起来较为麻烦:
function C() {
  return (
    <div className="grand">
      <h3>我是C组件</h3>
      <h4>
        我从A接受到的用户名:
        <MyContext.Consumer>
          {(value) => {
            return value.username;
          }}
        </MyContext.Consumer>
      </h4>
      <h4>
        我从A接受到的年龄:
        <MyContext.Consumer>
          {(value) => {
            return value.age;
          }}
        </MyContext.Consumer>
      </h4>
    </div>
  );
}
注意
在应用开发中,我们不是经常使用context,我们一般用它来封装
react组件,也就是编写组件的时候会用到
第七章 组件优化
Component的2个问题
1.通过之前的redux章节我们可以知道,只要执行
setState()即使不改变状态数据,组件也会重新render()
2.只有当前组件重新render(),就会自动重新render()子组件,即使子组件里没有任何更改;效率低
原因
Component中的
shouldComponentUpdate()总是返回true,所以才会造成不必要的组件更新
效率高的做法
只有当前组件的
state或props数据发生变化时才重新render()
第一种做法:使用shouldComponentUpdate判断props和state是否改变来决定是否更新
对于父组件:
//...
state = { laptopName: "YOGA 14S 2021" };
//更新组件之前的钩子
shouldComponentUpdate(nextProps, nextState) {
    console.log(this.props, this.state);
    console.log(nextProps, nextState);
    //状态或者props改变了才会返回true
    return (
        this.props !== nextProps || this.state.laptopName !== nextState.laptopName
    );
}
//...
对于子组件(只需要判断props是否改变即可):
class Child extends Component {
    shouldComponentUpdate(nextProps) {
        return !(this.props.laptopName === nextProps.laptopName);
    }
    render() {
        console.log("renderChild");
        return <div className="child">我是Child组件:</div>;
    }
}以上方法虽然可行,但是比较麻烦,正确的做法就是使用PureComponent
import React, { Component,PureComponent } from "react";
/....
class Child extends PureComponent {
  render() {
    console.log("renderChild");
    return <div className="child">我是Child组件:</div>;
  }
}PureComponent底层帮我们对比了props和state,并自动判断是否更新,但这个对比只是浅对比
changeLaptop = () => {
    const state = this.state
    state.laptopName = 'ddd'
    this.setState(state);
};
上面这样写是无效的
renderProps
如何向组件内部动态传入带内容的结构(标签元素)?
在vue中,我们可以使用插槽(slot)技术,就可以通过组件标签体传入结构
<P><Child /></P>在react中,我们有两种方式可以实现vue中的插槽:
- 使用children props:也就是通过组件标签体传入结构
- 使用render props:通过组件标签属性传入结构,一般使用render来命名这个标签属性
children props
{/*
Parent组件:
相当于Vue的插槽
*/}
<A x={100}>
    <B></B>
</A>

{/* A组件 */}
{/* 传入的内容会当作props的children属性 */}
<div className="child">
    <h3>我是A组件</h3>
    {this.props.children}
</div>

{/* B组件 */}
<h3>我是B组件:{this.props.name}</h3>
render props
{/*
    parent组件
    给A传入一个props,内容是一个返回组件的函数,带一个name参数,可作为B组件的props
    这个render是行业常用的命名,当然你可以自己定义名称
*/}
<A render={(name) => <B name={name} />} />

{/*
    A组件
    执行传入的render函数,返回一个带props的B组件,传入的props是A组件state中的name
*/}
<div className="child">
    <h3>我是A组件</h3>
    {this.props.render(name)}
</div>

{/*
    B组件无需改动
*/}
<div className="parent">
    <h3>我是B组件:{name}</h3>
</div>
总结:
使用renderProps作用和vue中的插槽传值一样,用于组件开发中,非常实用
parent组件想使用A组件,但不知道A组件内部传入的是什么子组件和属性,我们就可以使用renderProps
错误边界(Error boundary)
理解
错误边界(Error boundary):用来捕获后代组件的错误,渲染出备用页面
特点
错误边界只能捕获后代组件生命周期产生的错误,不能捕获自己组件产生的错误和其他组件在合成事件、定时器中产生的错误
使用方式
getDerivedStateFromError+componentDidCatch,前者捕获错误,并返回一个state,后者仅捕获错误
//生命周期函数,一旦后台组件报错就会触发
static getDerivedStateFromError(err) {
    console.log(err);
    return {
        hasError: err,
    };
}
componentDidCatch() {
console.log("渲染组件出错!(可以统计错误次数,反馈给后台,用于问题处理)");
}使用例
Parent组件
import React, { Component } from "react";
import Child from "./Child";
class Parent extends Component {
state = {
hasError: undefined,
};
//错误边界(这玩意只能在生产环境使用)
//当Parent的子组件出现报错的时候,会触发getDerivedStateFromError调用,并携带错误信息
static getDerivedStateFromError(err) {
console.log(err);
return {
hasError: err,
};
}
//渲染组件错误的时候会自动调用
componentDidCatch() {
    console.log("渲染组件出错!(可以统计错误次数,反馈给后台,用于问题处理)");
}
render() {
return (
<div>
<h2>我是parent组件</h2>
{this.state.hasError ? <h2>出错啦!</h2> : <Child></Child>}
</div>
);
}
}
export default Parent;Child组件
import React, { Component } from "react";

class Child extends Component {
  //假设服务器返回了不正确的内容
  state = {
    // users: [
    //   { id: "001", name: "kano", age: 18 },
    //   { id: "002", name: "jack", age: 19 },
    //   { id: "003", name: "peiqi", age: 20 },
    // ],
  };

  render() {
    return (
      <div>
        <h2>我是Child组件</h2>
        {this.state.users.map((item) => {
          return (
            <h4 key={item.id}>
              <span>{item.name}</span>
              <span>{item.age}</span>
            </h4>
          );
        })}
      </div>
    );
  }
}

export default Child;
由于使用了错误边界,在渲染时候就会让
hasError设置为true,这样就可以在用户界面端提示友好的错误信息了
但是注意:错误边界只能在生产模式中生效,开发模式会强制弹出错误调试界面
最后一点:错误边界不能捕获自己组件(编写错误边界的组件),定时器,合成事件产生的错误!!!
错误边界只能捕获后代组件生命周期产生的错误!!
总结组件通信方式
组件间的关系
- 父子组件
- 兄弟组件(非嵌套组件)
- 祖孙组件(跨级组件)
几种通信方式
- props
- children props
- render props
- 消息订阅-发布
- pub-sub event 等
- 集中式状态管理
- redux dva等
- context
- 生产者-消费者模式
比较合适的搭配
父子组件:props
兄弟组件:pub-sub(消息订阅与发布),redux(集中式管理)
祖孙组件(跨级组件):pub-sub(消息订阅与发布)、redux(集中式管理)、context(用的不多,多用在插件开发)
React Router6
概述
- React Router 以三个不同的包发布在npm上,他们分别为
react-router:路由的核心库,提供了很多的:组件、钩子react-router-dom:包含react-router所有的内容,并添加一些专门用于DOM的组件,例如<BrowserRouter>等react-router-native:包括react-router所有内容,并添加了一些专门用于ReactNative的API,例如NativeRouter等
- 与React Router5.x版本相比,有什么变化?
- 内置组件的变化:移除
<Switch />新增<Routes />等 - 语法的变化:
compnent={about}变为element={<About />}等。 - 新增多个hook:
useParams、useNavigate、useMatch等。 - 明确推荐函数式组件!所以不要在使用什么类式组件啦!!
- 更多请参照React Router官方页面
- 内置组件的变化:移除
Components
BrowserRouter
BrowserRouter用于包裹整个应用
示例代码:
import React from 'react'
import ReactDOM from 'react-dom'
import {BrowserRouter} from 'react-router-dom'
let root = ReactDOM.createRoot(document.getElementById("root"));
root.render(
    <BrowserRouter>
        <App root={root} />
    </BrowserRouter>
);
HashRouter
HashRouter用法和上面一样,也和router5一样,这里就不详细赘述了
Routes 与 Route
v6版本移除了先前的
Switch,引入了Routes
<Routes>和<Route>要配合使用,且必须要用<Routes>包裹<Route>
<Route>相当于一个if语句,如果路径和当前URL匹配,就呈现对应的组件
<Route caseSensitive>属性用于指定:匹配时是否区分大小写(默认false)
当URL发生变化时,<Routes>都会查看其所有子<Route>元素找到最佳匹配并呈现组件。
<Route>可以嵌套使用,且可配合useRoutes()配置“路由表”,但需要通过<Outlet>组件渲染子路由(有点像vue中的<Router-View>)
NavLink变化
1.在Router6中,NavLink中不再包含
activeClassName,如果想给link加上高亮效果,需要将className转变为函数式
2.可以在Navlink中添加end属性,可以实现子Navlink组件高亮,父组件取消高亮效果(默认是同时高亮)
<NavLink
    // activeClassName="active" //这玩意在router6中用不了了,只能在className内用函数
    to="/ddd"
    className={({ isActive }) => isActive ? "list-group-item active" : "list-group-item "}
    >
    xxx
</NavLink>

//默认情况下,当Home的子组件匹配成功,Home的导航也会高亮
//当NavLink上添加了end属性后,若Home的子组件匹配成功,则Home的导航取消高亮效果
<NavLink to="home" end >HOME</NavLink>
一级路由的重定向(Navigate)
在Router5中,我们使用Redirect来控制一级路由的重定向
在Router6中移除了Redirect,改用Navigate控制
使用方式:直接在Routes的最后添加Route,并在element属性中包裹Navigate即可
注意,在router6中,Route的component属性已经更换为element属性,而且值也由组件名更换为组件标签
{/* Router6 需要Routes包裹路由,作用和switch一样 */}
<Routes>
    <Route exact path="/about" element={<About />} />
    <Route exact path="/home" element={<Home />} />
    {/* 啥也没有默认去home */}
    <Route path="/" element={<Navigate to="/home" />}></Route>
</Routes>
使用Navigate进行自动跳转:
import React, { useState } from "react";
import { Navigate } from "react-router";
export default function Home() {
    const [sum, setSum] = useState(1);
    function plus() {
        setSum(sum + 1);
    }
    return (
        <div>
            <h3>我是Home的内容</h3>
            {/* 自动跳转 replace模式默认是false */}
            {sum === 3 ? <Navigate to="/about" replace={false} /> : <h4>当前sum的值是:{sum}</h4>}
            <button onClick={plus}>点我+1</button>
        </div>
    );
}
Navigate
- 作用:只要
<Navigate>组件被渲染,就会修改路径、切换视图 replace属性用于控制跳转模式(push 或者replace,默认是push)
示例代码:
import React, { useState } from "react";
import { Navigate } from "react-router";
export default function Home() {
  const [sum, setSum] = useState(1);
  return (
    <div>
      <h3>我是Home的内容</h3>
      {/* 自动跳转 */}
      {sum === 3 ? <Navigate to="/about" /> : <h4>当前sum的值是:{sum}</h4>}
      <button onClick={()=>setSum(sum + 1)}>点我+1</button>
    </div>
  );
}
路由表(useRoutes)
当我们需要使用多极路由的时候,只靠Routes管理路由会变得非常繁琐,这时候我们就可以使用路由表
路由表由useRoutes,Link或NavLink和Outlet组件配合完成
示例代码:
1.在src/routes/index.js中编写路由表
//路由表
import About from "../pages/About";
import Home from "../pages/Home";
import Message from "../pages/Home/Message";
import News from "../pages/Home/News";
import { Navigate } from "react-router";
import Detail from "../pages/Home/Message/Detail";
export const routes = [
  {
    path: "/about",
    element: <About />,
  },
  {
    path: "/home",
    element: <Home />,
    children: [
      { path: "news", element: <News /> },
      {
        path: "message",
        element: <Message />,
        children: [
          {
            //使用路由占位符传递params参数
            path: "detail",
            element: <Detail />,
          },
        ],
      },
    ],
  },
  {
    path: "/",
    element: <Navigate to="/about" />,
  },
];2.在src/components/index.jsx中使用useRoutes,参数为引入的routes路由表,然后在相应的位置注册路由
import React from "react";
import { useRoutes } from "react-router-dom";
import Header from "./Header";
import MyNavLink from "./MyNavLink";
import { routes } from "../routes/index";

export default function Index() {
  //使用useRoutes创建路由表
  const element = useRoutes(routes);
  return (
    <div className="container">
      <Header />
      {/* 需要包裹router */}
      <div className="row">
        <div className="col-offset-2 col-2">
          <div className="list-group">
            {/* 路由链接 */}
            <MyNavLink to="/about">About</MyNavLink>
            {/* 加上了end,只匹配子集路由的高亮,父级不会追加高亮*/}
            <MyNavLink to="/home" end>
              Home
            </MyNavLink>
          </div>
        </div>
        <div className="col-6">
          <div className="panel">
            <div className="panel-body">
              {/* 注册路由 */}
              {element}
            </div>
          </div>
        </div>
      </div>
    </div>
  );
}3.在二级路由组件中(src/pages/Home/index.jsx)使用Outlet作为子路由的渲染出口
import React from "react";
import { Outlet } from "react-router-dom";
import MyNavLink from "../../components/MyNavLink";

export default function Index() {
  return (
    <div>
      <h3>我是Home内容</h3>
      <ul className="nav nav-tabs">
        <li>
          {/* 二级路由的写法 */}
          <MyNavLink to="./news" className="list-group-item active">
            News
          </MyNavLink>
        </li>
        <li>
          <MyNavLink to="./message" className="list-group-item">
            Message
          </MyNavLink>
        </li>
      </ul>
      {/* 相当于vue中的router-view */}
      {/* 指定路由组件呈现的位置 */}
      <Outlet />
    </div>
  );
}
useParams() 接受params参数
1.作用:返回当前匹配路由的params参数、类似5.x中的match.params
示例代码:
import React from "react";
import { useMatch, useParams } from "react-router";
export default function Index() {
  //可以用useParams获取参数
  const { id, title, content } = useParams();
  //也可以用useMatch获取参数
  const match = useMatch("/home/message/detail/:id/:title/:content");
  console.log(match.params);
  return (
    <ul>
      <li>{id}</li>
      <li>{content}</li>
      <li>{title}</li>
    </ul>
  );
}
父级路由传递params参数的方法和router5中一样,也是字符串拼接形式
....
return (
    <li key={item.id}>
        <Link to={`detail/${item.id}/${item.title}/${item.content}`}>
            {item.content}
        </Link>
    </li>
);
....
注意,如果使用了路由表(useRoutes)则需要在路由表中添加占位符:
....
{
    path: "message",
        element: <Message />,
            children: [
                {
                    //使用路由占位符传递params参数
                    path: "detail/:id/:title/:content",
                    element: <Detail />,
                },
            ],
}
....
useSearchParams() 接受search参数
- 作用:用于读取和修改当前位置的URL中的查询字符串。
- 返回一个包含两个值的数组,内容分别为:当前的search参数、用于更新search的函数
示例代码:
import React from "react";
import { useSearchParams, useLocation } from "react-router-dom";
export default function Index() {
  //接受search(query)参数,接受到一个search对象,需要调用里面的get方法才能获取到传入的参数
  const [search, setSearch] = useSearchParams();
  const id = search.get("id");
  const title = search.get("title");
  const content = search.get("content");
  //x.search 可以拿到未经处理的search参数
  const x = useLocation();
  // setSearch 主要用于更新search参数(用的不多)
  console.log(setSearch("id=111&title=ddd"));
  return (
    <ul>
      <li>{id}</li>
      <li>{title}</li>
      <li>{content}</li>
      <button onClick={() => setSearch("id=114514")}>点我更新search参数</button>
    </ul>
  );
}p.s:useLocation可以拿到未经处理的search参数
search组件传参时候,路由表路径无需修改,父级组件Link只需要使用字符串拼接search参数即可
<li key={item.id}>
    <Link to={`detail?id=${item.id}&title=${item.title}&content=${item.content}`}>
        {item.content}
    </Link>
</li>
useLocation() 传递state参数
和params与search参数不一样,传递state参数需要使用函数式参数的Link组件
//state
const [messages] = useState([
    { id: "001", title: "消息1", content: "kanokano1" },
    { id: "002", title: "消息2", content: "kanokano2" },
    { id: "003", title: "消息3", content: "kanokano3" },
    { id: "004", title: "消息4", content: "kanokano4" },
]);

{/* state传参 */}
<Link
    to="detail"
    state={{
        id: item.id,
        content: item.content,
        title: item.title,
    }}>
    {item.content}
</Link>使用useLocation接受state参数
import React from "react";
import { useLocation } from "react-router-dom";
export default function Index() {
    //接受state参数
    const a = useLocation();
    console.log(a.state);
    const { id, title, content } = a.state;
    return (
        <ul>
            <li>{id}</li>
            <li>{title}</li>
            <li>{content}</li>
        </ul>
    );
}
useMatch()
1.作用:返回当前匹配信息,对标5.x中的路由组件的match属性
示例代码:
....
const match = useMatch('/home/:x/:y')
console.log(match)
/*
params: {x:'1',y:'3'}
pathname: "/home"
pathnameBase: "/home"
pattern: {path: '/home', caseSensitive: false, end: true}
*/
....
useInRouterContext()
useInRouterContext可以判断当前代码环境是否出于路由上下文中(被路由包裹)
console.log(useInRouterContext(), "useInRouterContext");useNavigationType()
可以判断当前页面路由是以什么方式导航的(pop、push、replace)
备注:POP是指浏览器中直接打开了这个路由组件(刷新页面)
console.log("useNavigationType:", useNavigationType());useOutlet()
用来呈现当前组件中渲染的嵌套路由的信息
如果嵌套路由没有挂载,则返回null
如果嵌套路由已经挂载,则显示嵌套路由对象
console.log(useOutlet(), "useOutlet");useResolvedPath()
作用:给定一个URL值,解析其中的path、search、hash值(貌似有点用)
console.log("useResolvedPath", useResolvedPath("/user?id=1&name=kano"));